Self-Host Your Browser Data

Overview

For a while now I have been looking for a self-hosted, cross-platform solution that would allow me to sync my browser data (specifically bookmarks and history) between different devices. In the past I’ve used some of the following but have not been entirely satisfied for a number of reasons:

  • iCloud
    • Not self-hosted
    • Required extension (if not using Safari)
    • Did not sync history (if syncing to windows machine)
  • Xmarks
    • Not self-hosted
    • Did not sync history
    • Required extension on all browsers
    • Not mobile-friendly
  • Floccus
    • ✅ Self Hosted
    • Did not sync history
    • Requires extension on all browsers
    • Not mobile-friendly
    • Great for sharing bookmarks with others (Can use Nextcloud as storage)

Firefox Sync Server

Recently I discovered Firefox Sync Server which is an official self-hosted implementation of Mozilla’s sync service for syncing all Firefox account information. Although development on this is low priority, I have proved it to be reliable and well worth the effort to setup. Once configured, all my dreams come true:

  • ✅ Self Hosted & Free!
  • ✅ Cross-platform clients (requires the use of Firefox browsers – which I prefer anyway!)
  • ✅ Mobile Friendly
  • ✅ Syncs any or all of the following: Bookmarks, History, Tabs, Addresses, Credit Cards, Add-Ons, and Firefox Settings

Configure the Server

There are a few different ways to run the Firefox Sync Server but I found Docker-Compose to be the easiest way to get up and running quickly:

1. Setup docker (not covered in this post)
2. Create a new docker-compose (or stack):

version: '3.7'
services:
    syncserver:
        container_name: firefox_syncserver
        image: mozilla/syncserver:latest
        volumes:
            - data:/data
        ports:
            - 5000:5000
        environment:
            SYNCSERVER_PUBLIC_URL: 'https://firefoxsyncserver.your_domain.com'
            SYNCSERVER_SECRET: 'add_a_random_secret_text'
            SYNCSERVER_SQLURI: 'sqlite:////data/syncserver.db'
            SYNCSERVER_BATCH_UPLOAD_ENABLED: 'true'
            SYNCSERVER_FORCE_WSGI_ENVIRON: 'true'
            PORT: '5000'
        restart: always
        
volumes:
    data:

3. Setup remote access to the service. My preferred way is to use a reverse proxy lik NGINXProxyManager.
At minimum you need:
– A static ip or an externally accessible domain (if you don’t have one, you can get one via DuckDNS)
– Port forward the desired port to your Firefox Sync Server

4. Start/deploy the docker container/stack and navigate to the SYNCSERVER_PUBLIC_URL defined in the compose file to verify that the service is running correctly:

Setup Client Browsers

In order to use your self-hosted Firefox Sync Server you will need to configure each client to use your custom sync server:

Desktop Client

Changing the sync server on Firefox desktop is easy:

1. In your address bar navigate to: about:config

2. Search for: identity.sync.tokenserver.uri and modify the value to match the SYNCSERVER_PUBLIC_URL defined in the compose with an additional path of /token/1.0/sync/1.5

3. Sign into your Firefox Account as normal – This is only to authenticate – not to store your browser data. (You can also host your own Firefox Account Server, but that is out of the scope of this post).

4. Attempt to sync. The sync should take at least a few seconds – if it completes immediately, there may be an issue. To tell if the sync properly saved your browser data to your personal server, you can navigate to about:sync-log and browse the log files to make sure your sync server is being referenced instead of the default firefox sync server.

iOS Client

Changing the sync server on Firefox iOS is also easy:

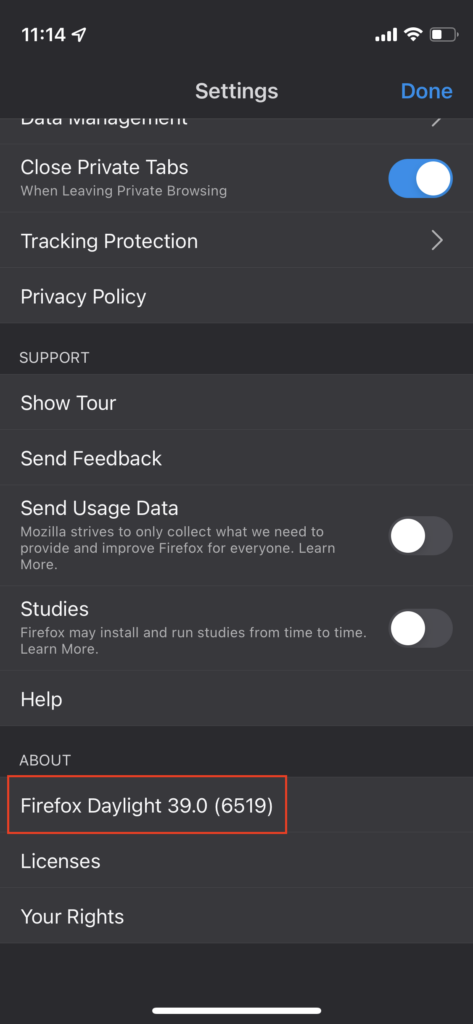
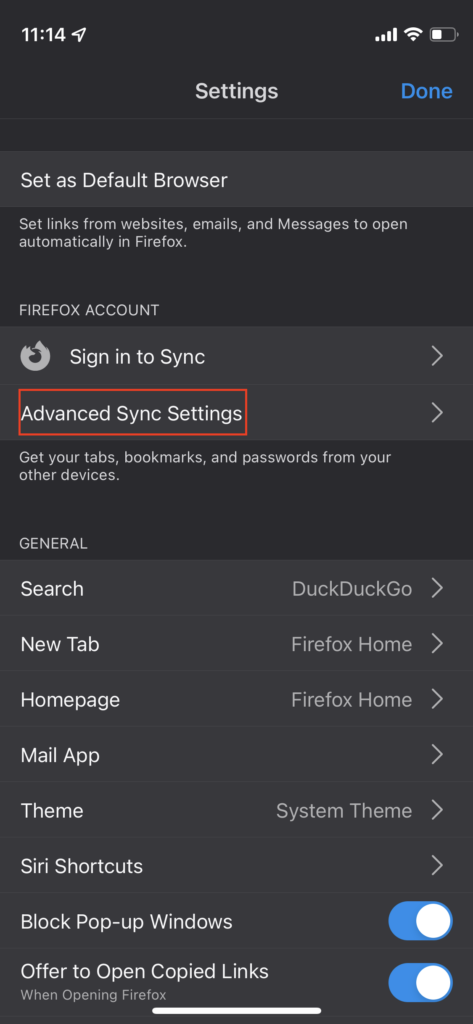
1. Open the iOS Firefox app and navigate to Settings.

2. Scroll to the bottom of the settings pane and tap on “Firefox Daylight” five times quickly (This will enable the advanced/debug menu):

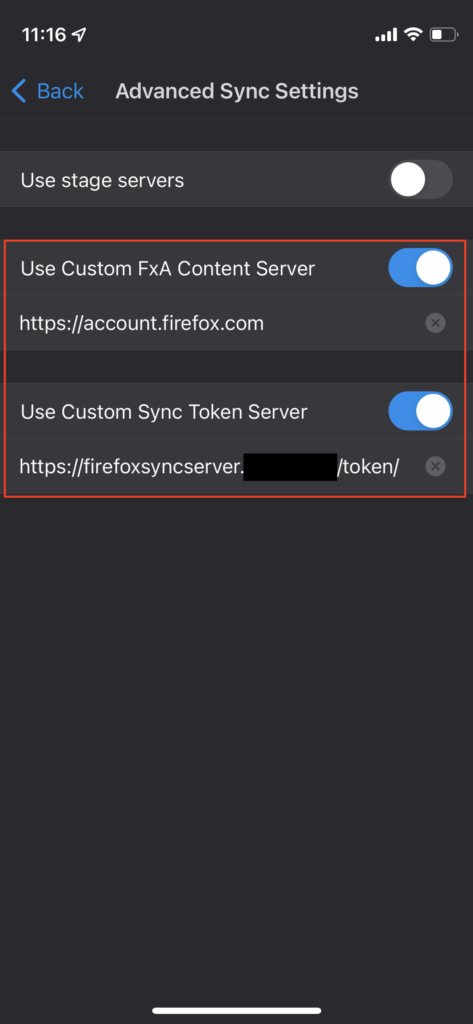
3. Setup the advanced settings according to the screenshots below (be sure to only include the /token/ path for the token server url – you do not need to additional `/1.0/sync/1.5` path that is needed for Firefox desktop. ALSO instead of the url in the screenshot, use accountS.firefox.org for the FxA server (note the S).

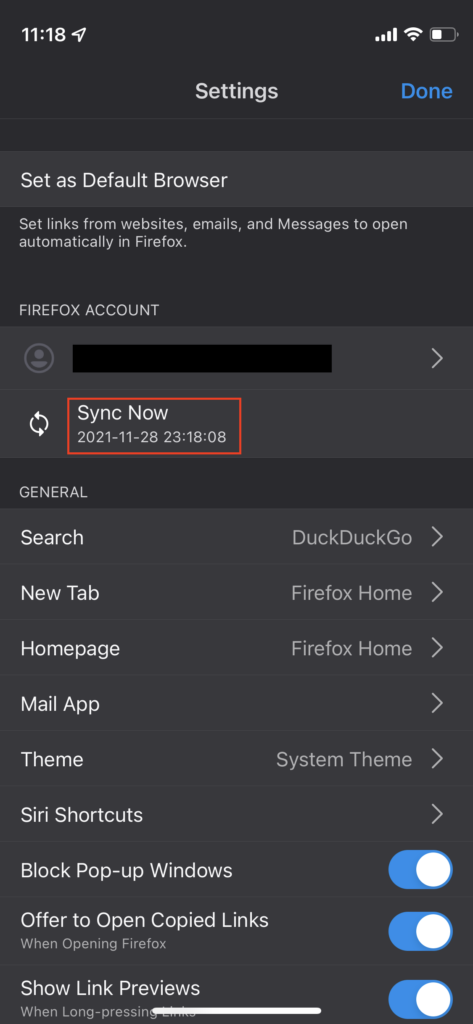
4. Sign into your Firefox Account (again this is only used to authenticate – not to store your browser data).

5. Sync your browser data, and confirm that you can see the changes on your other clients that are synced to your same Firefox Sync Server.

Decloud

Once you feel satisfied that your sync server is working correctly and that you have proper backups in place to prevent data loss, go ahead and remove your other sync solutions like (iCloud, Xmarks, etc) and delete the data stored on any of those cloud services. You’re in control of your data now!

~ Don’t litter! – That includes your personal data on the internet!

How To Delete Your Facebook

Overview

Let’s just admit it. Facebook has become a drain on society. From the cesspool-like comment threads, to the encouragement of unhealthy relationships/connections, to pure social addiction, most of what Facebook has become is not something I want to continue to be a part of.

Goals

I have the following goals in deleting my Facebook:

✅ Download as much of my personal information as possible (Media, Documents, etc)

✅ Still be able to manage organization pages

✅ Delete my personal Facebook account and as much of it’s associated information as possible

Take Control Of Your Information

Download

Before deleting your Facebook account it is a good idea to download your information for future reference (even if you don’t ever plan too need it). Thankfully the download process isn’t too difficult:

  1. Browse to the “Download Your Information” settings page.
  2. In the Date Range field, choose: All-Time
  3. In the Format field choose HTML
  4. Click Create File.
  5. Wait a couple hours/days and you will receive an email with a link to download your infomration
  6. Repeat steps 1-5 but change the Format field to JSON (This can be used to import your information into another service at a later point if desired)
  7. Take a few minutes to unzip the downloaded information and look around. You will begin to realize that facebook really does know more about you than you think – You’re the product! For reference, I’m not an active facebook user and the un-ziped download contained 9,278 files in the following directories:

Transfer

Downloading your facebook information in the way above includes all of your data, but if you want a more accessible/organized download of your photos, videos, notes, or posts, you should transfer your data in addition to downloading it. Once the transfer is complete, I recommend downloading the files to your computer from the new location, then delete them. Keep your data local and keep it backed up!

Create Dummy Account (For managing other pages)

If you need to manage other Facebook pages/groups, you may still need an account. We can create a dummy account used solely for the purpose of managing these pages/groups:

  1. Log out of your existing Facebook account.
  2. Browse to Facebook.com and sign up for a new account.
    • Be sure to use a fake name and information
  3. Sign into your old Facebook account and complete the following:
    • Give your dummy account ownership or admin roles for any pages/groups you want to keep.
    • Un-link or setup an email address for any accounts that have been setup using Facebook Login (websites that let you log in using your Facebook account)
  4. Sign out of your old Facebook account
  5. Sign into your dummy account and verify that you have ownership/admin access to your pages/groups that you wish to keep

Delete Facebook

  1. Finally we get to do the deed. 🎉 Let’s delete Facebook for good:
  2. Browse to the deletion page in your Facebook settings.
  3. Choose Delete Account (Don’t think twice).
  4. Click Continue to Account Deletion.
  5. At this point, look over the accounts that will be deleted.
  6. If any pages/groups show up that you want to keep, be sure to transfer ownership/admin role to your dummy Facebook account before continuing!
  7. Click Continue
  8. Congratulate yourself for doing something that only few have been able to do!

~ Do you remember the day you signed up for Facebook? Remember what happened to Facebook the next time you are tempted to sign up for the latest and greatest social media service. A wise man once told me “Email is the best social media.”

Privacy: Virtual Credit Card Numbers

Overview

I’ve always found it frustrating that a credit card number is static – in other words it can not easily be changed by the owner to prevent duplication by anyone with access to the card (i.e. waiter, convenience store worker, etc).

Today I re-discovered that some Citi Credit cards have the option of generating separate virtual credit cards for use on individual purchases (this option was removed at one point). This is a great boon to security – especially when needing to make a purchase from a ‘less than reputable’ site online.

Below we will look at my two favorite options for creating virtual credit cards, and then we will take a look at the benefits of using these virtual cards:

Option 1: Privacy.com

There may be other similar services, but I’ve enjoyed using the free service of Privacy.com (This is a referral link) to generate virtual credit cards. Use cases may include scenarios like:

  • Limit a subscription service to a certain amount each month – and if they raise the cost, the auto-payment will fail.
  • Create a one-time use credit card for one-off purchases
  • Keep your own bank from knowing what you purchase (all they see is that you purchased something from privacy.com!

How do they make their money?

If you’re wondering how they make their money, they take the place of the Credit Card Companies and charge the vendor a small fee (You don’t incur any additional charges).

Requirements to use Privacy.com

It requires you to provide the details of your debit card or a checking account.

How it works

Using the Privacy.com website, a mobile App, or a browser extension (the most useful), you can generate any number of virtual credit cards with various parameters. The browser extension is the most useful because it will automatically detect credit card fields and auto-generate a card for you and fill the credit card fields automatically (It’s like magic)!

Yes, I realize that I’m giving up some privacy in handing over my debit card information to privacy.com, but I personally find it a worth-while trade off.

Creating a New Virtual Card
Add Optional Spending Limit
My Virtual Card (Don’t worry, I deleted it after creating it!)

Option 2: Virtual Account Numbers

This option is dependent upon your Credit Card provider having this feature. Currently I know that CitiCard is working on an improvement to the usability of generating virtual card numbers. There is an existing method but it is rather clunky, outdated, and not very quick since it requires you to be logged into the CitiCard website to generate each virtual card number:

Benefits of Virtual Credit Cars

  • You can close the virtual card at any time or modify the spending limit.
  • If you are asked for a name/address when using the card, you can enter anything and the card won’t be rejected! (Privacy.com cards only)
  • There are small cash-back bonuses when using the privacy.com cards.(Privacy.com cards only)
  • When purchasing using a Privacy.com virtual card, even your own bank (issuer of the debit card) won’t know what, or from who you are purchasing! The transactions will show up in your bank like: