Go FOSS: Android

This past year I’ve made some great strides in relying more off FOSS (Free and Open Source Software). A few reasons for moving toward an all-foss software stack are:

  • Free – Of course we like free! I wanted to avoid monthly subscriptions for simple services.
  • Privacy – I’d prefer to not have my data on large company servers – Also why I prefer Self-Hosting.
  • Auditable code – I don’t often audit the code, but on occasion I do!
  • Contributable code – If i want a feature, I can contribute it – or easily request it on a git repository

To aid my future self (and others) in moving more toward FOSS alternatives, I’ve began compiling a list of FOSS android apps on github.

For the most up to date list see: https://github.com/meichthys/go_foss_android

For reference, here is the list as of 2024-01-16:

πŸ“± My FOSS Andriod Apps

After much search and peril I have compiled this list which I believe to be the best set of FOSS Android apps that support my (and hopefully most people’s) full software requirements.

⚠️ This list does not try to list ALL foss android apps (see offa/android-foss), but rather the best app in each category that fits <i>my</i> daily use case.

πŸ“‹ The List

App Type Shields Permission<sup>1</sup> Notes
Obtainium App Store GitHub Repo stars GitHub LicenseGitHub last commit (branch) 🌐<br />πŸ”” Use this to Install the rest
AndBible Bible GitHub Repo starsGitHub LicenseGitHub last commit (branch) 🌐<br />πŸ””
Firefox Browser GitHub Repo starsGitHub LicenseGitHub last commit (branch) πŸ“·πŸ“πŸŽ€πŸŒπŸ”” Extensions make this browser very powerful – and we need Firefox to survive!
SimpleCalendar Calendar GitHub Repo starsGitHub LicenseGitHub last commit (branch) πŸ—“οΈπŸ””πŸ“‡ Nice compact month view<br />Use with DavX5
OpenCamera Camera SourceForge Last CommitSourceForge Downloads πŸ“·πŸŽ€ Currently No FOSS cameras support live/motion photos
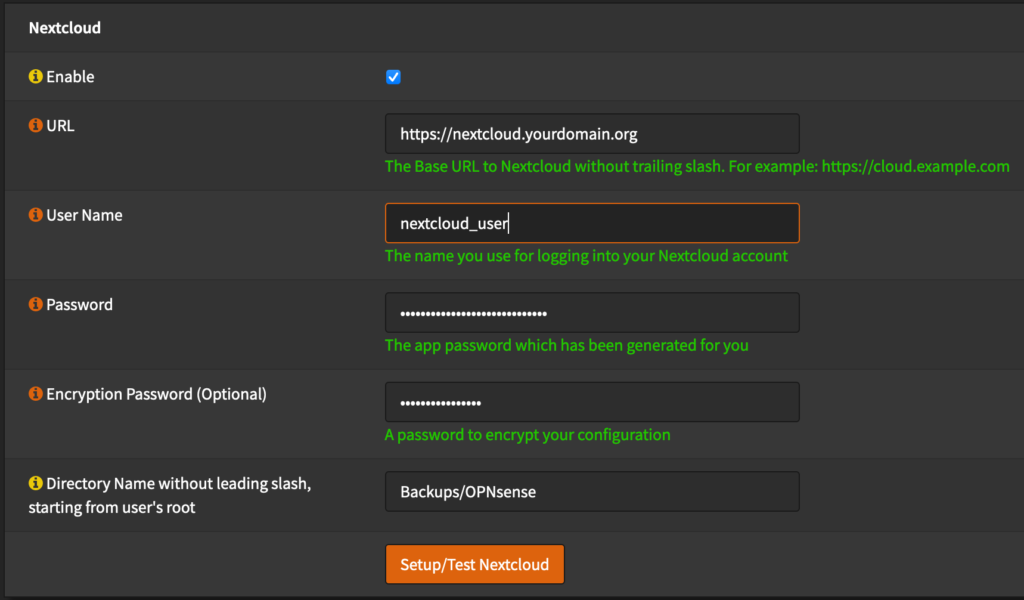
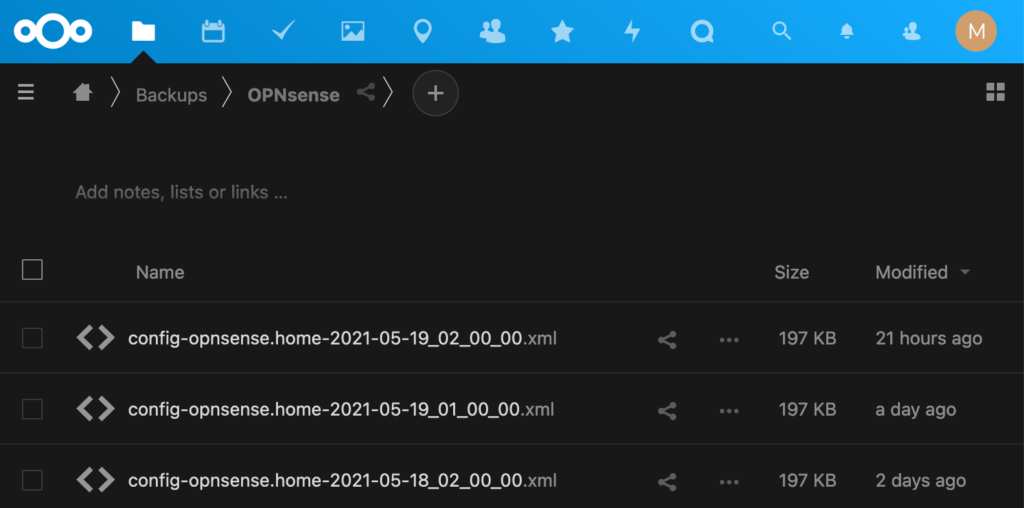
Nextcloud Cloud Storage GitHub Repo starsGitHub LicenseGitHub last commit (branch) πŸ“·πŸŒπŸ”” Requires DAV Server (Nextcloud)
FairEmail Email GitHub Repo starsGitHub LicenseGitHub last commit (branch) πŸ—“οΈπŸ“‡πŸŒπŸ”” So. Many. Features.
DavX<sup>5</sup> DAV Sync GitHub Repo starsGitHub LicenseGitHub last commit (branch) πŸ—“οΈπŸ“‡πŸŒπŸ”” Requires DAV Server (Nextcloud)<br />Use with Calendar, Contacts, and Tasks
Desktop Integration GitHub Repo starsGitHub LicenseGitHub last commit (branch) πŸ—“οΈπŸ“‡πŸ“‚πŸŒπŸ””πŸ“ž
OSSDocumentScanner Document Scanner GitHub Repo starsGitHub LicenseGitHub last commit (branch) πŸ“·πŸŒ
SimpleFileManager File Manager GitHub Repo starsGitHub LicenseGitHub License πŸ“‚
Aves Gallery GitHub Repo starsGitHub LicenseGitHub last commit (branch) πŸŒπŸ–ΌοΈ
OpenBoard Keyboard GitHub Repo starsGitHub LicenseGitHub last commit (branch) πŸ“‡
Kvaesitso Launcher GitHub Repo starsGitHub LicenseGitHub last commit (branch) πŸ—“οΈπŸ“‡πŸ“πŸŒ Also seethis great comparison of other foss launchers.
Signal Messaging GitHub Repo starsGitHub LicenseGitHub last commit (branch) πŸ“·πŸ“‡πŸ“πŸŽ€πŸŒπŸ””πŸ“žπŸ–ΌοΈ
NextcloudNotes Notes GitHub Repo starsGitHub LicenseGitHub last commit (branch) 🌐 Requires Nextcloud Server<br /><br /><br />Non-Server Alternative: OmniNote
Bitwarden Password Manager GitHub Repo starsGitHub LicenseGitHub last commit (branch) πŸ“·πŸŒπŸ”” Requires Bitwarden Server Instance (SeeVaultwarden)
SimpleDialer Phone / Dialer GitHub Repo starsGitHub LicenseGitHub last commit (branch) πŸ“·πŸ“‡πŸŽ€πŸŒπŸ””πŸ“ž
AudioBookshelf Podcast / AudioBooks GitHub Repo starsGitHub LicenseGitHub last commit (branch) 🌐 RequiresAudiobookshelf Server Instance<br /><br /><br />Non-Server Alternative: Podverse
Nextcloud News RSS Reader GitHub Repo starsGitHub LicenseGitHub last commit (branch) πŸŒπŸ”” Requires Nextcloud instance<br /><br />Non-Server Alernative: ReadYou
QKSMS SMS GitHub Repo starsGitHub LicenseGitHub last commit (branch) πŸ“‡πŸŒπŸ””πŸ“ž Project may be abandoned(?)
Tasks Tasks GitHub Repo starsGitHub LicenseGitHub last commit (branch) πŸ—“οΈπŸ“πŸŒπŸ”” Use with DavX5 to sync CalDav Tasks
omWeather Weather GitHub Repo starsGitHub LicenseGitHub last commit (branch) πŸ“πŸŒ Extended Forecast & Radar
  1. πŸ—“οΈ:Calendar πŸ“·:Camera πŸ“‡:Contacts πŸ“‚:Files πŸ“:Location 🎀:Microphone 🌐:Network πŸ””:Notifications πŸ“ž:Phone πŸ–ΌοΈ:Photos/Videos

πŸ“’ Acknowledgements

Much of my perilous search was improved by the following resources:

πŸ› οΈ Contributing

Contributions are welcome, but please keep in mind, this list is an β€˜opinionated’ list on which I will make the final determination. Suggestions for different apps are highly recommended since I may have missed some apps (or app features) in my perilous search.

πŸ—’οΈ License: MIT

~ If you had to guess, what percentage of software that you use is FOSS? My rough estimate is about 80%.

Free and OpenSource Photo Libraries

Overview

In my quest to reduce my reliance upon proprietary software applications, I’ve begun to focus some more time in finding a good Google Photos or Apple Photos alternative. As began looking at the alternatives, I discovered that there were way more options that I had originally anticipated. Each alternative had a different feature set and I found it difficult to compare the different options. To solve this dilemma for myself (and hopefully for many others), I’m compiling a list of free and open source photo libraries that can be self-hosted or run locally without any need for cloud services.

Google/Apple Photos Alternatives

My alternative comparison list looks like the following (Be sure to visit the github repository for the most up to date comparison.

** This page was last updated on 2023-06-05

Free and OpenSource Photo Libraries

There are many great free and open-source alternatives to paid photo libraries. This project aims to track and compare the feature set between the many different options with a focus on ‘Gratis’ (free as in free beer) open source photo libraries. ‘Libre’ (free as in free speech) projects are also welcome, but will likely need to be submitted via a pull request since the time in testing each different project is significant.

Comparison

βœ… = Feature exists in at least a limited fashion
🚧 = Feature may exist but may not be practical or officially released
❌ = Feature does not yet exist
#️⃣ = Subjective measure of feature quality (on scale of 0-10)
Tip: Hover over icons for missing/incomplete features for more information (link to repository issue, etc)
Feature Damselfly HomeGallery Immich Librephotos Lychee Nextcloud Photos Nextcloud Memories Photonix Photofield PiGallery2 Photoprism Photoview Piwigo
Github Stars ? ? ? ? ? ? ? ? ? ? ? ? ?
Active Contributors 1 1 4 2 3 3 1 1 1 1 4 1 3
Source Language C# JavaScript / TypeScript Dart / TypeScript Python PHP JavaScript PHP / Vue Python Go / Vue TypeScript Go Typescript / Go PHP
License ? ? ? ? ? ? ? ? ? ? ? ? ?
Demo ❌ βœ…6️⃣ βœ…6️⃣ βœ…5️⃣ βœ…4️⃣ βœ…4️⃣ βœ…8️⃣ βœ…8️⃣ βœ…6️⃣ βœ…8️⃣ βœ…9️⃣ βœ…9️⃣ βœ…9️⃣
Freeness βœ…πŸ”Ÿ βœ…πŸ”Ÿ βœ…πŸ”Ÿ βœ…πŸ”Ÿ βœ…πŸ”Ÿ βœ…πŸ”Ÿ βœ…πŸ”Ÿ βœ…πŸ”Ÿ βœ…πŸ”Ÿ βœ…πŸ”Ÿ 🚧7️⃣ βœ…πŸ”Ÿ βœ…πŸ”Ÿ
Automatic Mobile Upload ❌ ❌ βœ…7️⃣ ❌ ❌ βœ…7️⃣ βœ…7️⃣ ❌ ❌ ❌ βœ…6️⃣ ❌ βœ…7️⃣
Web App βœ…8️⃣ βœ…8️⃣ βœ…8️⃣ βœ…8️⃣ βœ…8️⃣ βœ…7️⃣ βœ…9️⃣ βœ…7️⃣ βœ…9️⃣ βœ…7️⃣ βœ…7️⃣ βœ…8️⃣ βœ…8️⃣
Android App ❌ ❌ βœ…8️⃣ βœ…7️⃣ ❌ βœ…3️⃣ βœ…3️⃣ βœ…4️⃣ ❌ ❌ 🚧4️⃣ 🚧3️⃣ βœ…7️⃣
iOS App ❌ ❌ βœ…8️⃣ 🚧3️⃣ ❌ βœ…3️⃣ βœ…3️⃣ βœ…4️⃣ ❌ ❌ 🚧4️⃣ βœ…6️⃣ βœ…7️⃣
Desktop App βœ…9️⃣ βœ…8️⃣ ❌ ❌ ❌ βœ…2️⃣ βœ…2️⃣ ❌ ❌ ❌ ❌ ❌ ❌
LivePhotos Support ❌ ❌ βœ…9️⃣ ❌ βœ…6️⃣ βœ…οΈ3️⃣ βœ…8️⃣ ❌ ❌ ❌ βœ…7️⃣ ❌ ❌
Video Support ❌ βœ…6️⃣ βœ…7️⃣ βœ…8️⃣ βœ…6️⃣ βœ…5️⃣ βœ…7️⃣ ❌ βœ…3️⃣ βœ…8️⃣ βœ…7️⃣ βœ…7️⃣ βœ…4️⃣
Photo Map βœ…7️⃣ βœ…8️⃣ βœ…4️⃣ βœ…8️⃣ βœ…5️⃣ βœ…6️⃣ βœ…8️⃣ βœ…9️⃣ ❌ βœ…8️⃣ βœ…6️⃣ βœ…8️⃣ βœ…7️⃣
Photo Discovery ❌ ❌ ❌ βœ…7️⃣ βœ…6️⃣ βœ…6️⃣ βœ…7️⃣ ❌ ❌ ❌ βœ…6️⃣ ❌ βœ…1️⃣
Albums ❌ ❌ βœ…8️⃣ βœ…9️⃣ βœ…8️⃣ βœ…4️⃣ βœ…8️⃣ βœ…5️⃣ ❌ βœ…6️⃣ βœ…8️⃣ βœ…6️⃣ βœ…8️⃣
Slideshow ❌ ❌ ❌ ❌ ❌ βœ…5️⃣ βœ…5️⃣ ❌ βœ…6️⃣ βœ…7️⃣ βœ…6️⃣ ❌ βœ…5️⃣
Timeline βœ…5️⃣ βœ…3️⃣ βœ…8️⃣ βœ…9️⃣ ❌ βœ…4️⃣ βœ…9️⃣ βœ…5️⃣ βœ…6️⃣ βœ…5️⃣ βœ…5️⃣ βœ…9️⃣ βœ…3️⃣
Photo Sharing ❌ ❌ βœ…4️⃣ βœ…9️⃣ βœ…9️⃣ βœ…8️⃣ βœ…8️⃣ ❌ ❌ βœ…7️⃣ βœ…7️⃣ βœ…8️⃣ βœ…5️⃣
Photo Search βœ…8️⃣ βœ…7️⃣ βœ…7️⃣ βœ…8️⃣ βœ…5️⃣ βœ…4️⃣ βœ…4️⃣ βœ…8️⃣ βœ…9️⃣ βœ…7️⃣ βœ…8️⃣ βœ…5️⃣ βœ…7️⃣
Duplicate Handling ❌ ❌ βœ…6️⃣ ❌ ❌ βœ…8️⃣ βœ…8️⃣ ❌ ❌ βœ…5️⃣ βœ…6️⃣ ❌ βœ…6️⃣
User Defined Tags βœ…7️⃣ βœ…7️⃣ ❌ ❌ βœ…5️⃣ βœ…οΈ3️⃣ βœ…οΈ3️⃣ βœ…6️⃣ βœ…6️⃣ ❌ βœ…5️⃣ ❌ βœ…7️⃣
Docker Installation βœ…8️⃣ βœ…8️⃣ βœ…7️⃣ βœ…7️⃣ βœ…7️⃣ βœ…6️⃣ βœ…6️⃣ βœ…8️⃣ βœ…7️⃣ βœ…7️⃣ βœ…6️⃣ βœ…8️⃣ βœ…7️⃣
Object/Face Recognition βœ…8️⃣ βœ…6️⃣ βœ…6️⃣ βœ…8️⃣ ❌ βœ…8️⃣ βœ…8️⃣ βœ…8️⃣ βœ…7️⃣ βœ…6️⃣ βœ…9️⃣ βœ…6️⃣ βœ…5️⃣
Basic Editing ❌ ❌ ❌ ❌ ❌ βœ…6️⃣ βœ…6️⃣ ❌ ❌ ❌ ❌ ❌ ❌
EXIF Data βœ…9️⃣ ❌ βœ…7️⃣ ❌ βœ…7️⃣ ❌ βœ…8️⃣ βœ…7️⃣ 🚧3️⃣ βœ…7️⃣ βœ…9️⃣ βœ…7️⃣ βœ…6️⃣
Multiple User Support βœ…7️⃣ ❌ βœ…7️⃣ βœ…8️⃣ βœ…6️⃣ βœ…9️⃣ βœ…9️⃣ βœ…7️⃣ ❌ βœ…7️⃣ ❌ βœ…6️⃣ βœ…8️⃣

Note: This list is by no means comprehensive. For links to other photo library projects, see the Awesome Self-Hosted list and the Awesome Privacy list.

An HTML version of this comparison table is here: https://meichthys.github.io/foss_photo_libraries/

Contributing

Please contribute additions and corrections! When contributing, please add links to the source of the information. (i.e. link to an issue that indicates that a feature does not exist)


~ Don’t give away your photos to the largest data collection entities in the world! Your photos document your life better than any other kinds of data. Pictures are worth more than a thousand words to advertisers!

Self-Host Your Browser Data

Overview

For a while now I have been looking for a self-hosted, cross-platform solution that would allow me to sync my browser data (specifically bookmarks and history) between different devices. In the past I’ve used some of the following but have not been entirely satisfied for a number of reasons:

  • iCloud
    • Not self-hosted
    • Required extension (if not using Safari)
    • Did not sync history (if syncing to windows machine)
  • Xmarks
    • Not self-hosted
    • Did not sync history
    • Required extension on all browsers
    • Not mobile-friendly
  • Floccus
    • βœ… Self Hosted
    • Did not sync history
    • Requires extension on all browsers
    • Not mobile-friendly
    • Great for sharing bookmarks with others (Can use Nextcloud as storage)

Firefox Sync Server

Recently I discovered Firefox Sync Server which is an official self-hosted implementation of Mozilla’s sync service for syncing all Firefox account information. Although development on this is low priority, I have proved it to be reliable and well worth the effort to setup. Once configured, all my dreams come true:

  • βœ… Self Hosted & Free!
  • βœ… Cross-platform clients (requires the use of Firefox browsers – which I prefer anyway!)
  • βœ… Mobile Friendly
  • βœ… Syncs any or all of the following: Bookmarks, History, Tabs, Addresses, Credit Cards, Add-Ons, and Firefox Settings

Configure the Server

There are a few different ways to run the Firefox Sync Server but I found Docker-Compose to be the easiest way to get up and running quickly:

1. Setup docker (not covered in this post)
2. Create a new docker-compose (or stack):

version: '3.7'
services:
    syncserver:
        container_name: firefox_syncserver
        image: mozilla/syncserver:latest
        volumes:
            - data:/data
        ports:
            - 5000:5000
        environment:
            SYNCSERVER_PUBLIC_URL: 'https://firefoxsyncserver.your_domain.com'
            SYNCSERVER_SECRET: 'add_a_random_secret_text'
            SYNCSERVER_SQLURI: 'sqlite:////data/syncserver.db'
            SYNCSERVER_BATCH_UPLOAD_ENABLED: 'true'
            SYNCSERVER_FORCE_WSGI_ENVIRON: 'true'
            PORT: '5000'
        restart: always
        
volumes:
    data:

3. Setup remote access to the service. My preferred way is to use a reverse proxy lik NGINXProxyManager.
At minimum you need:
– A static ip or an externally accessible domain (if you don’t have one, you can get one via DuckDNS)
– Port forward the desired port to your Firefox Sync Server

4. Start/deploy the docker container/stack and navigate to the SYNCSERVER_PUBLIC_URL defined in the compose file to verify that the service is running correctly:

Setup Client Browsers

In order to use your self-hosted Firefox Sync Server you will need to configure each client to use your custom sync server:

Desktop Client

Changing the sync server on Firefox desktop is easy:

1. In your address bar navigate to: about:config

2. Search for: identity.sync.tokenserver.uri and modify the value to match the SYNCSERVER_PUBLIC_URL defined in the compose with an additional path of /token/1.0/sync/1.5

3. Sign into your Firefox Account as normal – This is only to authenticate – not to store your browser data. (You can also host your own Firefox Account Server, but that is out of the scope of this post).

4. Attempt to sync. The sync should take at least a few seconds – if it completes immediately, there may be an issue. To tell if the sync properly saved your browser data to your personal server, you can navigate to about:sync-log and browse the log files to make sure your sync server is being referenced instead of the default firefox sync server.

iOS Client

Changing the sync server on Firefox iOS is also easy:

1. Open the iOS Firefox app and navigate to Settings.

2. Scroll to the bottom of the settings pane and tap on “Firefox Daylight” five times quickly (This will enable the advanced/debug menu):

3. Setup the advanced settings according to the screenshots below (be sure to only include the /token/ path for the token server url – you do not need to additional `/1.0/sync/1.5` path that is needed for Firefox desktop. ALSO instead of the url in the screenshot, use accountS.firefox.org for the FxA server (note the S).

4. Sign into your Firefox Account (again this is only used to authenticate – not to store your browser data).

5. Sync your browser data, and confirm that you can see the changes on your other clients that are synced to your same Firefox Sync Server.

Decloud

Once you feel satisfied that your sync server is working correctly and that you have proper backups in place to prevent data loss, go ahead and remove your other sync solutions like (iCloud, Xmarks, etc) and delete the data stored on any of those cloud services. You’re in control of your data now!

~ Don’t litter! – That includes your personal data on the internet!

How To Delete Your Facebook

Overview

Let’s just admit it. Facebook has become a drain on society. From the cesspool-like comment threads, to the encouragement of unhealthy relationships/connections, to pure social addiction, most of what Facebook has become is not something I want to continue to be a part of.

Goals

I have the following goals in deleting my Facebook:

βœ… Download as much of my personal information as possible (Media, Documents, etc)

βœ… Still be able to manage organization pages

βœ… Delete my personal Facebook account and as much of it’s associated information as possible

Take Control Of Your Information

Download

Before deleting your Facebook account it is a good idea to download your information for future reference (even if you don’t ever plan too need it). Thankfully the download process isn’t too difficult:

  1. Browse to the “Download Your Information” settings page.
  2. In the Date Range field, choose: All-Time
  3. In the Format field choose HTML
  4. Click Create File.
  5. Wait a couple hours/days and you will receive an email with a link to download your infomration
  6. Repeat steps 1-5 but change the Format field to JSON (This can be used to import your information into another service at a later point if desired)
  7. Take a few minutes to unzip the downloaded information and look around. You will begin to realize that facebook really does know more about you than you think – You’re the product! For reference, I’m not an active facebook user and the un-ziped download contained 9,278 files in the following directories:

Transfer

Downloading your facebook information in the way above includes all of your data, but if you want a more accessible/organized download of your photos, videos, notes, or posts, you should transfer your data in addition to downloading it. Once the transfer is complete, I recommend downloading the files to your computer from the new location, then delete them. Keep your data local and keep it backed up!

Create Dummy Account (For managing other pages)

If you need to manage other Facebook pages/groups, you may still need an account. We can create a dummy account used solely for the purpose of managing these pages/groups:

  1. Log out of your existing Facebook account.
  2. Browse to Facebook.com and sign up for a new account.
    • Be sure to use a fake name and information
  3. Sign into your old Facebook account and complete the following:
    • Give your dummy account ownership or admin roles for any pages/groups you want to keep.
    • Un-link or setup an email address for any accounts that have been setup using Facebook Login (websites that let you log in using your Facebook account)
  4. Sign out of your old Facebook account
  5. Sign into your dummy account and verify that you have ownership/admin access to your pages/groups that you wish to keep

Delete Facebook

  1. Finally we get to do the deed. πŸŽ‰ Let’s delete Facebook for good:
  2. Browse to the deletion page in your Facebook settings.
  3. Choose Delete Account (Don’t think twice).
  4. Click Continue to Account Deletion.
  5. At this point, look over the accounts that will be deleted.
  6. If any pages/groups show up that you want to keep, be sure to transfer ownership/admin role to your dummy Facebook account before continuing!
  7. Click Continue
  8. Congratulate yourself for doing something that only few have been able to do!

~ Do you remember the day you signed up for Facebook? Remember what happened to Facebook the next time you are tempted to sign up for the latest and greatest social media service. A wise man once told me “Email is the best social media.”

Uptime Kuma

Overview

Uptime Kuma is a ‘fancy’ self-hosted monitoring service that can be used to create your very own status page of any services you would like to monitor. Initial configuration and setting up monitors is very easy.

Setting Up Uptime Kuma

The preferred method for setting up Uptime Kuma is Docker. And to make the setup in docker even easier, I like to use Portainer:

Create a new stack in Portainer:

version: '3.3'

services:
  uptime-kuma:
    image: louislam/uptime-kuma
    container_name: uptimekuma
    restart: always
    volumes:
      - data:/app/data
    ports:
      - 3001:3001

volumes:
  data:

Start the Stack and Log In

Login Page

Add Monitors

Sample HTTP Monitor

Bonus

You can use a reverse proxy like NGINXProxyManager to fetch an SSL cert and expose the Uptime Kuma service publicly:

Bad Chrome Bad!

Overview

I’ve never been a big fan of the Chrome browser because of it’s privacy implications, but I’ve also begrudgingly have had to use it on occasion for certain web services like some video chat services that don’t work on other browsers.

Situation

Today I was updating my wife’s macbook when I realized her machine was almost out of storage space (also probably why things were a bit sluggish). After looking at the storage settings it became apparent that over 23GB of storage was being used by none other than Google Chrome!

Bad Chrome, that’s un-called for! Looking at the .app bundle it became immediately apparent that Chrome was hoarding old versions of itself!

6 years of Chrome versions!

Wow, I’m not sure if I should be impressed that the same Chrome .app bundle survived 6 years on the mac or if I should be ashamed of myself for letting it survive that long πŸ€·β€β™‚οΈ. Either way, it was time to clean house. After deleting all but the most recent version folder we reclaimed almost all of the storage originally claimed by Chrome.

Moral of the Story

The moral of the story is:

  • Chrome doesn’t clean up after itself like I would expect the #1 market share browser should.
  • I need to bit the bullet and ditch chrome for good one of these days 😝
  • It might be a good idea to remove .app bundles and re-download them on occasion to re-fresh things – who knows what else could have been floating around in there for the past 6 years!

Self-Hosing Should Be (and can be) Easy

Overview

Any readers of this blog are probably aware that I often self-host open-source services. Self-Hosting can be daunting at first, but with a little groundwork, it can be quite easy, safe, and rewarding. Recently I deployed my own instance of the handy draw.io – from start to finish it took me less than 5 minutes. The ease of deploying the service reminded me how far I have come in my journey of self-hosting. Only a couple years ago I would have been completely lost about where to begin, but now I have it boiled down to two primary steps: Deploy docker container, expose docker container using NGINXProxymanager.

Prerequisites

There are some prerequisites that should be in place before self hosting. Some of them listed below are not required but make it much more enjoyable and rewarding. I won’t get into the weeds about why these are important, since my goal in the post is to show how easy self-hosting CAN be – not how hard it actually IS!

  • Your own Domain
  • A good internet connection (specifically upload speeds)
  • A router that supports advanced options (like OPNSense)
  • A properly configured NGINX reverse proxy (like NGINXProxyManager)
  • A hypervisor (like proxmox) and/or a docker host

Draw.io in 5 Minutes

The below steps are not a tutorial on how to setup Draw.io, but rather my workflow now that I have all the prerequisites in place to spin up a new self-hosted service in minutes. My steps were:

  • SSH into my Docker Host and modify my docker_compose.yaml file that contains the blueprint of my docker services. I simply add the following:
  #Draw.io
  drawio:
    image: fjudith/draw.io
    container_name: drawio
    restart: unless-stopped
    ports:
      - 1005:8080
  • On my Docker host I run the following to bring up my Draw.io docker container.
sudo docker-compose up -d
  • Next I open up NGINXProxyManager and expose the Draw.io service to the Internet. NGINXProxyManager handles the task of using a Let’s Encrypt certificate to expose the internal service over HTTPS:
  • That’s it. Now I can navigate to draw.my_domain.com and enjoy Draw.io running on my own personal server!
Draw.io welcome screen.

Privacy: Virtual Credit Card Numbers

Overview

I’ve always found it frustrating that a credit card number is static – in other words it can not easily be changed by the owner to prevent duplication by anyone with access to the card (i.e. waiter, convenience store worker, etc).

Today I re-discovered that some Citi Credit cards have the option of generating separate virtual credit cards for use on individual purchases (this option was removed at one point). This is a great boon to security – especially when needing to make a purchase from a ‘less than reputable’ site online.

Below we will look at my two favorite options for creating virtual credit cards, and then we will take a look at the benefits of using these virtual cards:

Option 1: Privacy.com

There may be other similar services, but I’ve enjoyed using the free service of Privacy.com (This is a referral link) to generate virtual credit cards. Use cases may include scenarios like:

  • Limit a subscription service to a certain amount each month – and if they raise the cost, the auto-payment will fail.
  • Create a one-time use credit card for one-off purchases
  • Keep your own bank from knowing what you purchase (all they see is that you purchased something from privacy.com!

How do they make their money?

If you’re wondering how they make their money, they take the place of the Credit Card Companies and charge the vendor a small fee (You don’t incur any additional charges).

Requirements to use Privacy.com

It requires you to provide the details of your debit card or a checking account.

How it works

Using the Privacy.com website, a mobile App, or a browser extension (the most useful), you can generate any number of virtual credit cards with various parameters. The browser extension is the most useful because it will automatically detect credit card fields and auto-generate a card for you and fill the credit card fields automatically (It’s like magic)!

Yes, I realize that I’m giving up some privacy in handing over my debit card information to privacy.com, but I personally find it a worth-while trade off.

Creating a New Virtual Card
Add Optional Spending Limit
My Virtual Card (Don’t worry, I deleted it after creating it!)

Option 2: Virtual Account Numbers

This option is dependent upon your Credit Card provider having this feature. Currently I know that CitiCard is working on an improvement to the usability of generating virtual card numbers. There is an existing method but it is rather clunky, outdated, and not very quick since it requires you to be logged into the CitiCard website to generate each virtual card number:

Benefits of Virtual Credit Cars

  • You can close the virtual card at any time or modify the spending limit.
  • If you are asked for a name/address when using the card, you can enter anything and the card won’t be rejected! (Privacy.com cards only)
  • There are small cash-back bonuses when using the privacy.com cards.(Privacy.com cards only)
  • When purchasing using a Privacy.com virtual card, even your own bank (issuer of the debit card) won’t know what, or from who you are purchasing! The transactions will show up in your bank like:

Discovering OPNSense: Configuration Backups

Overview

After migrating to OPNSense from pfSense, I have been discovering numerous features that I never knew existed in OPNSense. These little features are what makes me have zero regrets for switching to OPNSense. Today we will look at the various options for backing up configuration changes. After all, backups should be high on the priority list after first setting up OPNSense.

Nextcloud Backup

This is one of my favorite features of Nextcloud that was missing from pfSense. The ability to backup one Open-Source software to another just makes my day! It’s as easy as entering my Nextcloud credentials and specifying the backup location:

OPNSense Nextcloud Backup Configuration
OPNSense Backups in Nextcloud

Manual Backup

Manual backups are a quick and easy way to take a configuration backup. I generally use this if/when I need to rebuild my entire network/homelab from scratch (if/when my Nextcloud is not available to be backed up to)

OPNSense Manual Configuration Backup

Google Drive Backup

I won’t discuss much about this here since I’m not a fan of Google Drive for privacy reasons, but if you are, you can feel somewhat confident that your configuration that is saved on Google drive is safe because it can be encrypted.

OPNSense Google Drive Backup Configuration

Related Posts

Securing OPNSense: 2FA

Overview

OPNSense is designed with security in mind, but there are some security settings which are not enabled by default – one of them being Two-Factor-Authentication (2FA). I am a big fan of 2FA since it is a simple step that significantly enhances the ‘security at the front door’ (Don’t forget security at the back door though! – access via SSH does not have 2FA enabled, so enforcing a ssh certificate is recommended – more on this in a later post).

Why 2FA

In my opinion, 2FA is probably the best bang for the buck when it comes to adding security to an application/service. It is usually easy to implement, requires minimal effort to use, and arguably enhances security by a factor of 100%. Just do it and don’t look back, you won’t regret enabling/using it.

Setup 2FA

Enabling 2FA is pretty simple in OPNSense. Simply:

  1. In OPNSense navigate to System > Access > Servers or just simply search for servers in the searchbar:
  1. Click the Add button
  1. Give the Authentication server a name, in my case I’ll call it ‘Password + TOTP’
  2. Change the type to Local + Timebased One Time Password
  3. All the other defaults should be fine.
  4. Save the changes.
  5. Navigate to System > Access > Users and click the pencil icon to modify your user
  6. Look for OTP seed and click Generate new secret (160 bit)
  7. Click Save
  8. How under the OTP seed setting there should be a button that says Click to unhide. Clicking this button will display a QR Code that can be used to setup your favorite TOTP (Time based One Time Password) app. My favorite is OTP Auth. Simply scan the QR Code using the app and you should immediately see the 2FA code displayed for 30 seconds at a time.
Example QR Code (Don’t worry, This isn’t my actual QR Code)
TOTP iOS App view

Test 2FA

Before enabling 2FA you will want to test it to make sure your code is working. To do so:

  1. Navigate to System > Access > Tester
  1. Select your new Authentication Server from the dropdown, enter your username and password.
  2. Add your TOTP code the the FRONT of your password (You may be used to entering the TOTP code in a separate input box, but OPNSense combines the password with the TOTP code)
  3. If setup correctly, OPNSense should display a success message:

Enable 2FA

Now that you have setup and tested 2FA, you should be able to enable it:

  1. Navigate to System > Settings > Administration
  1. Scroll to the bottom and change the Authentication Server to your new server (in my case: Password + TOTP)
    • Note: You should disable/unselect the other Local Database server to prevent logins without using 2FA.
  1. Test your code by trying to log out of and log back into OPNSenseNote: this would be a good time to take a snapshot or a backup of OPNSense if you ahve a means of doing so – just in case you can’t get back in! (In my case I can take a simple Proxmox snapshot)

Bask in your vastly improved security!

  • Optionally make sure a certificate is required via ssh login (or disable ssh login completely) since ssh login does not support 2FA.

Related Posts