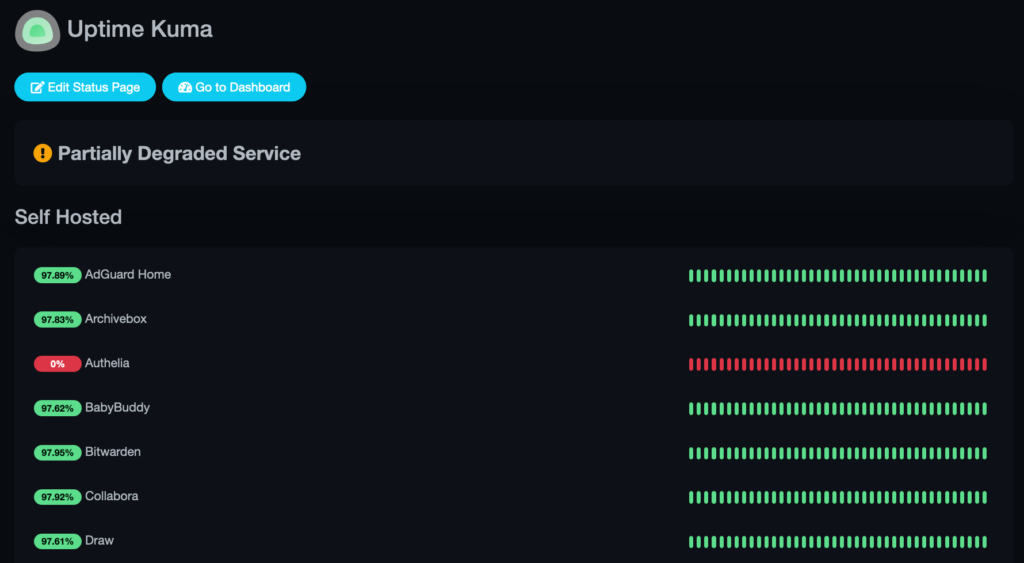
Uptime Kuma is a ‘fancy’ self-hosted monitoring service that can be used to create your very own status page of any services you would like to monitor. Initial configuration and setting up monitors is very easy.
Setting Up Uptime Kuma
The preferred method for setting up Uptime Kuma is Docker. And to make the setup in docker even easier, I like to use Portainer:
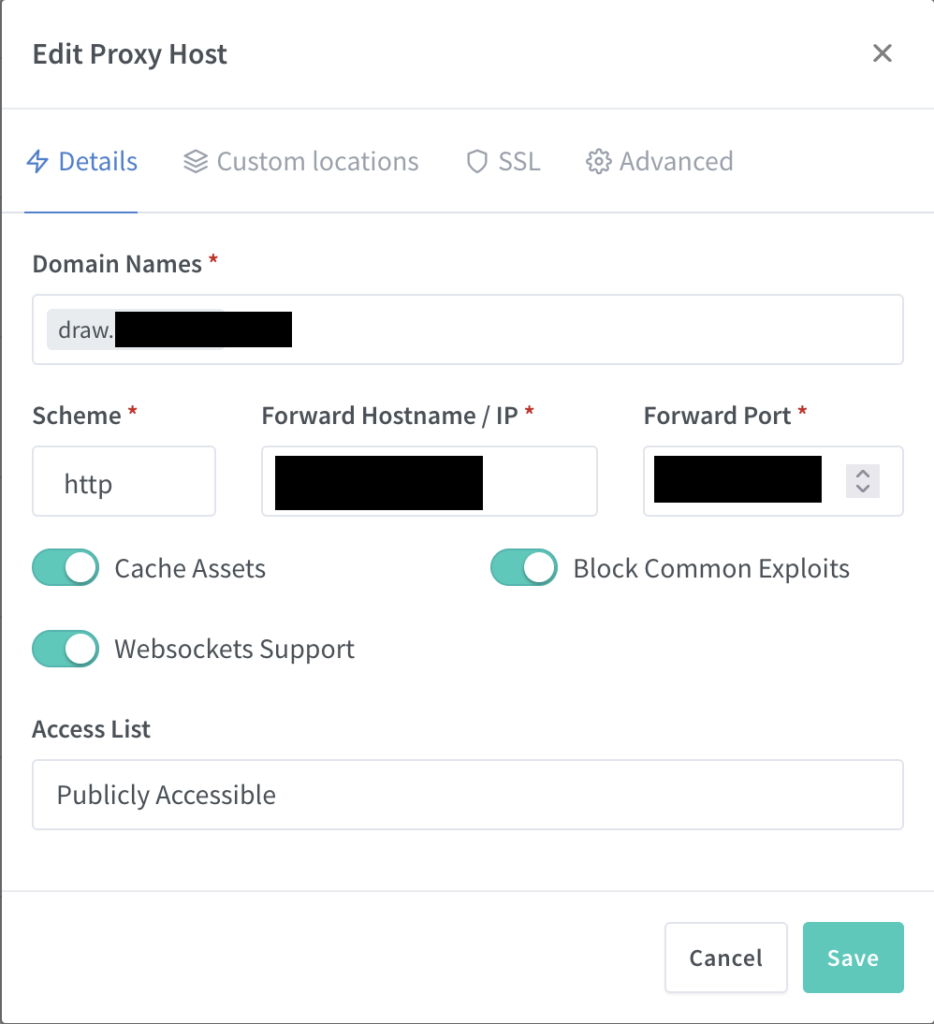
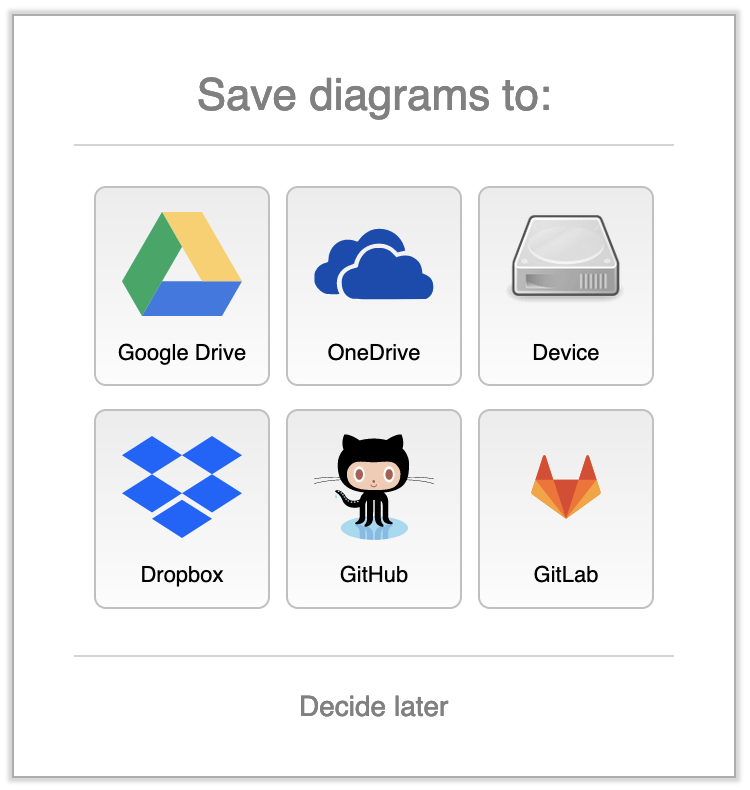
Any readers of this blog are probably aware that I often self-host open-source services. Self-Hosting can be daunting at first, but with a little groundwork, it can be quite easy, safe, and rewarding. Recently I deployed my own instance of the handy draw.io – from start to finish it took me less than 5 minutes. The ease of deploying the service reminded me how far I have come in my journey of self-hosting. Only a couple years ago I would have been completely lost about where to begin, but now I have it boiled down to two primary steps: Deploy docker container, expose docker container using NGINXProxymanager.
Prerequisites
There are some prerequisites that should be in place before self hosting. Some of them listed below are not required but make it much more enjoyable and rewarding. I won’t get into the weeds about why these are important, since my goal in the post is to show how easy self-hosting CAN be – not how hard it actually IS!
Your own Domain
A good internet connection (specifically upload speeds)
A router that supports advanced options (like OPNSense)
The below steps are not a tutorial on how to setup Draw.io, but rather my workflow now that I have all the prerequisites in place to spin up a new self-hosted service in minutes. My steps were:
SSH into my Docker Host and modify my docker_compose.yaml file that contains the blueprint of my docker services. I simply add the following:
On my Docker host I run the following to bring up my Draw.io docker container.
sudo docker-compose up -d
Next I open up NGINXProxyManager and expose the Draw.io service to the Internet. NGINXProxyManager handles the task of using a Let’s Encrypt certificate to expose the internal service over HTTPS:
NGINXProxyManager
NGINXProxyManager Configuration
That’s it. Now I can navigate to draw.my_domain.com and enjoy Draw.io running on my own personal server!
After migrating to OPNSense from pfSense, I have been discovering numerous features that I never knew existed in OPNSense. These little features are what makes me have zero regrets for switching to OPNSense. Today we will look at the various options for backing up configuration changes. After all, backups should be high on the priority list after first setting up OPNSense.
Nextcloud Backup
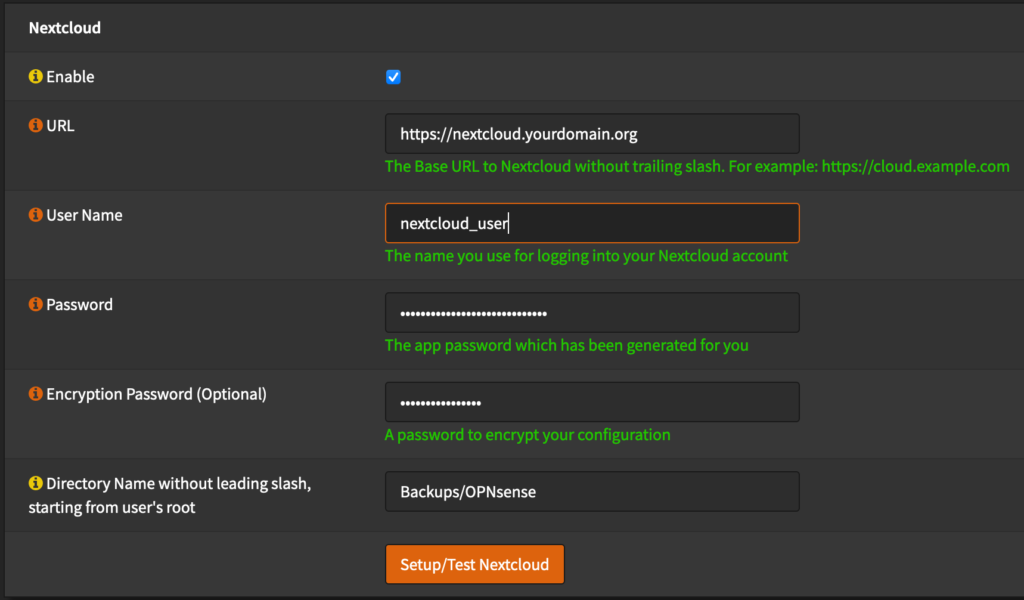
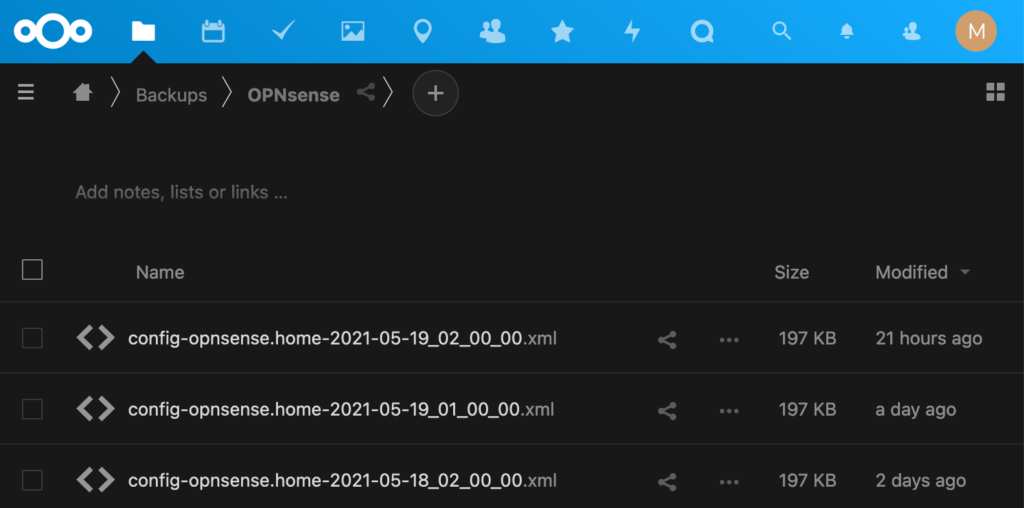
This is one of my favorite features of Nextcloud that was missing from pfSense. The ability to backup one Open-Source software to another just makes my day! It’s as easy as entering my Nextcloud credentials and specifying the backup location:
OPNSense Nextcloud Backup ConfigurationOPNSense Backups in Nextcloud
Manual Backup
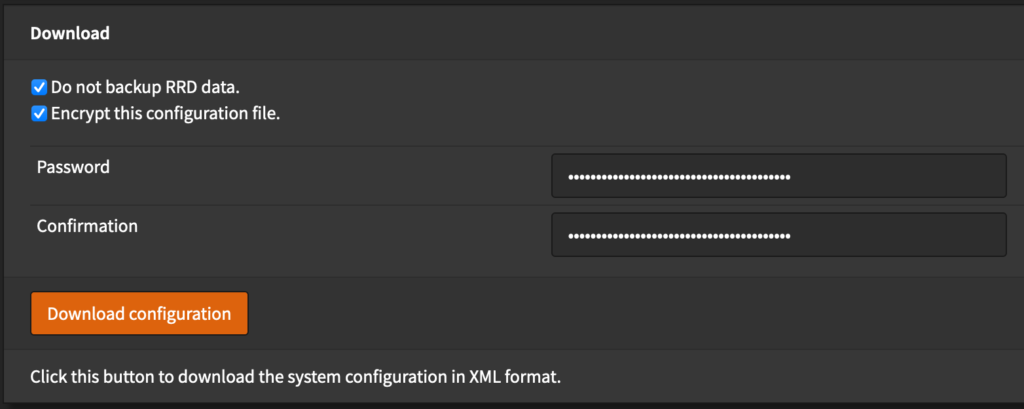
Manual backups are a quick and easy way to take a configuration backup. I generally use this if/when I need to rebuild my entire network/homelab from scratch (if/when my Nextcloud is not available to be backed up to)
OPNSense Manual Configuration Backup
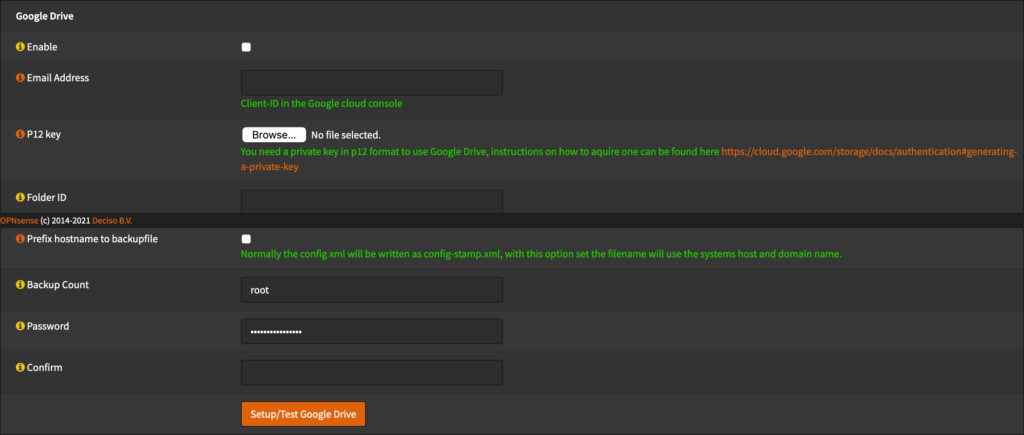
Google Drive Backup
I won’t discuss much about this here since I’m not a fan of Google Drive for privacy reasons, but if you are, you can feel somewhat confident that your configuration that is saved on Google drive is safe because it can be encrypted.
OPNSense is designed with security in mind, but there are some security settings which are not enabled by default – one of them being Two-Factor-Authentication (2FA). I am a big fan of 2FA since it is a simple step that significantly enhances the ‘security at the front door’ (Don’t forget security at the back door though! – access via SSH does not have 2FA enabled, so enforcing a ssh certificate is recommended – more on this in a later post).
Why 2FA
In my opinion, 2FA is probably the best bang for the buck when it comes to adding security to an application/service. It is usually easy to implement, requires minimal effort to use, and arguably enhances security by a factor of 100%. Just do it and don’t look back, you won’t regret enabling/using it.
Setup 2FA
Enabling 2FA is pretty simple in OPNSense. Simply:
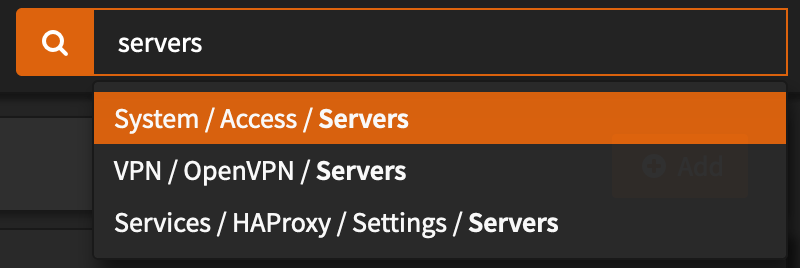
In OPNSense navigate to System > Access > Servers or just simply search for servers in the searchbar:
Click the Add button
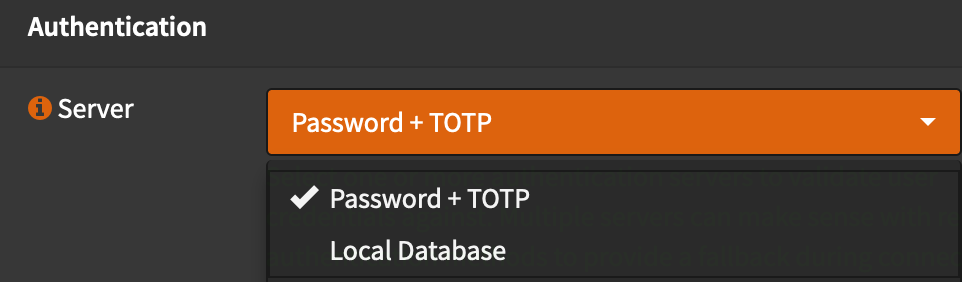
Give the Authentication server a name, in my case I’ll call it ‘Password + TOTP’
Change the type to Local + Timebased One Time Password
All the other defaults should be fine.
Save the changes.
Navigate to System > Access > Users and click the pencil icon to modify your user
Look for OTP seed and click Generate new secret (160 bit)
Click Save
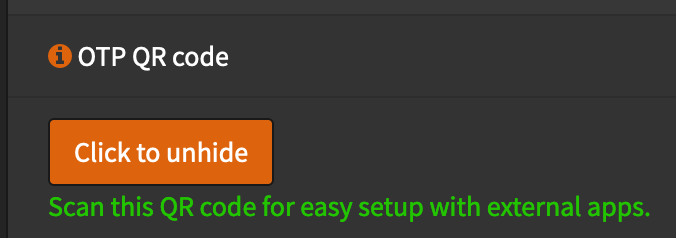
How under the OTP seed setting there should be a button that says Click to unhide. Clicking this button will display a QR Code that can be used to setup your favorite TOTP (Time based One Time Password) app. My favorite is OTP Auth. Simply scan the QR Code using the app and you should immediately see the 2FA code displayed for 30 seconds at a time.
Example QR Code (Don’t worry, This isn’t my actual QR Code)
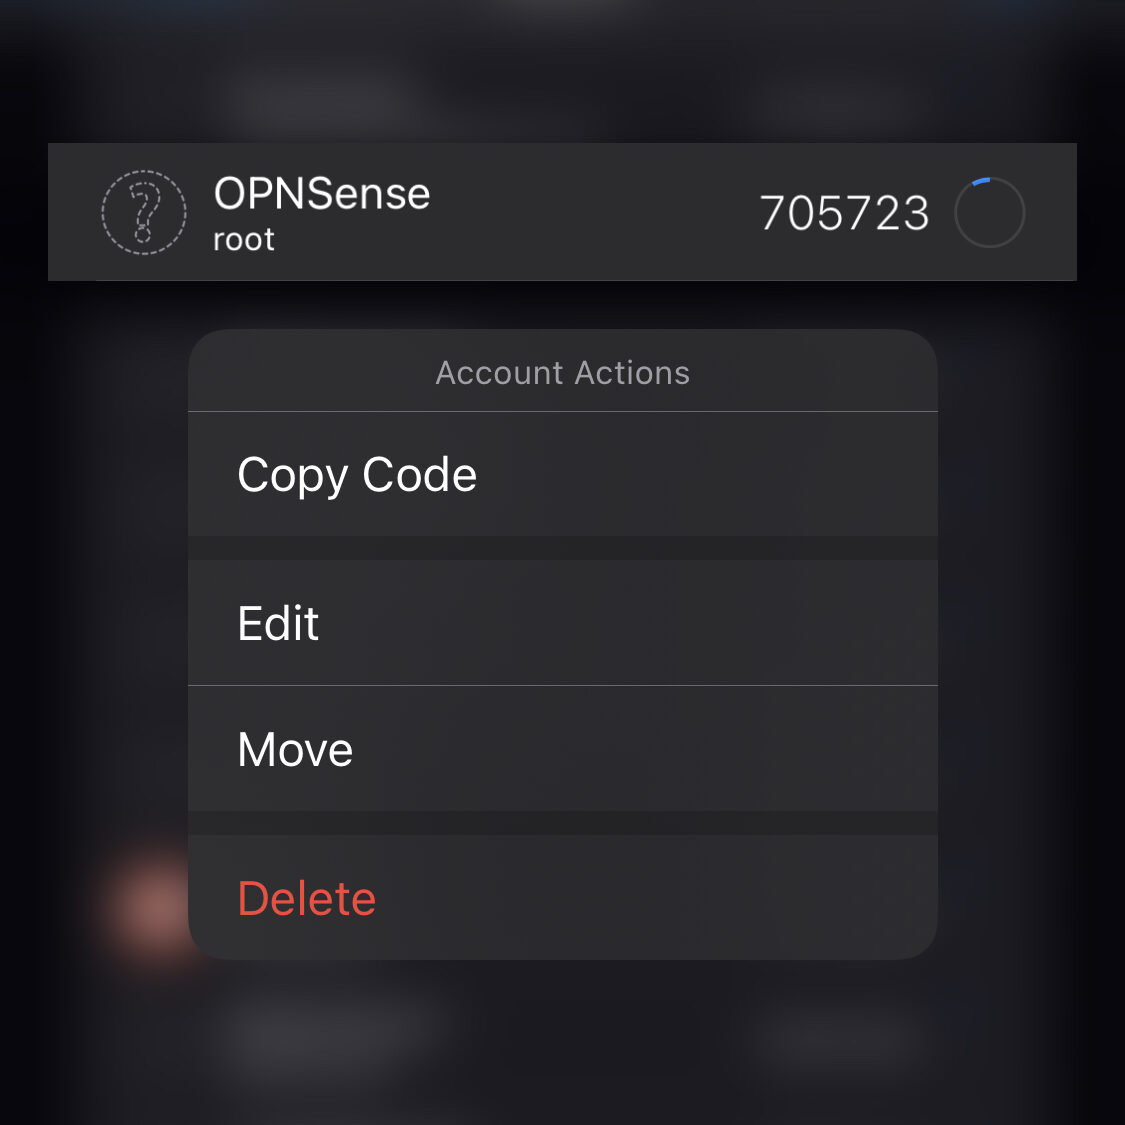
TOTP iOS App view
Test 2FA
Before enabling 2FA you will want to test it to make sure your code is working. To do so:
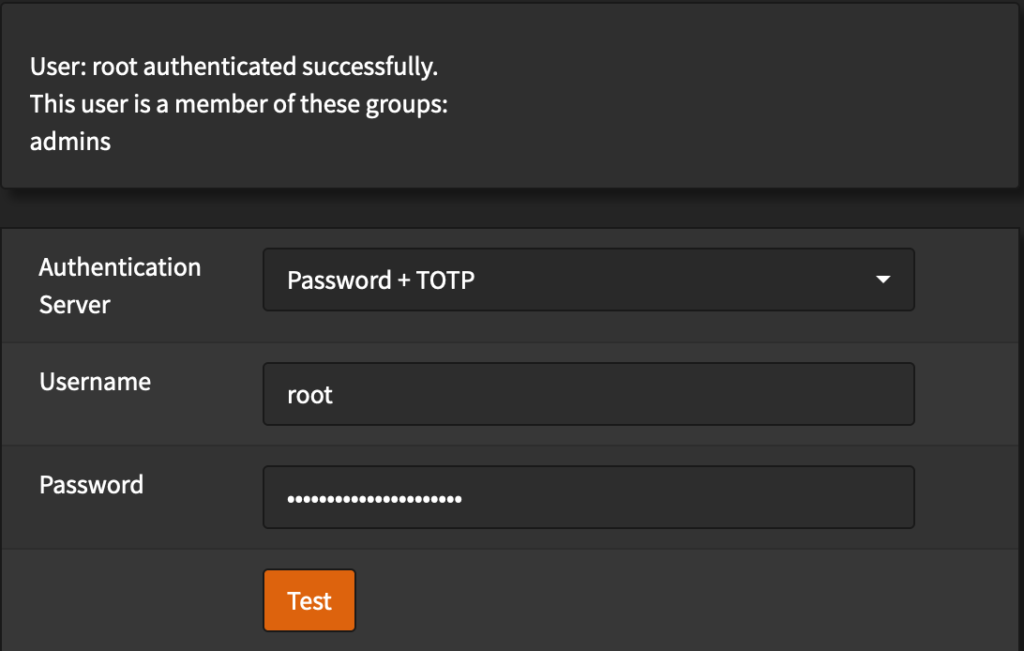
Navigate to System > Access > Tester
Select your new Authentication Server from the dropdown, enter your username and password.
Add your TOTP code the the FRONT of your password (You may be used to entering the TOTP code in a separate input box, but OPNSense combines the password with the TOTP code)
If setup correctly, OPNSense should display a success message:
Enable 2FA
Now that you have setup and tested 2FA, you should be able to enable it:
Navigate to System > Settings > Administration
Scroll to the bottom and change the Authentication Server to your new server (in my case: Password + TOTP)
Note: You should disable/unselect the other Local Database server to prevent logins without using 2FA.
Test your code by trying to log out of and log back into OPNSenseNote: this would be a good time to take a snapshot or a backup of OPNSense if you ahve a means of doing so – just in case you can’t get back in! (In my case I can take a simple Proxmox snapshot)
Bask in your vastly improved security!
Optionally make sure a certificate is required via ssh login (or disable ssh login completely) since ssh login does not support 2FA.
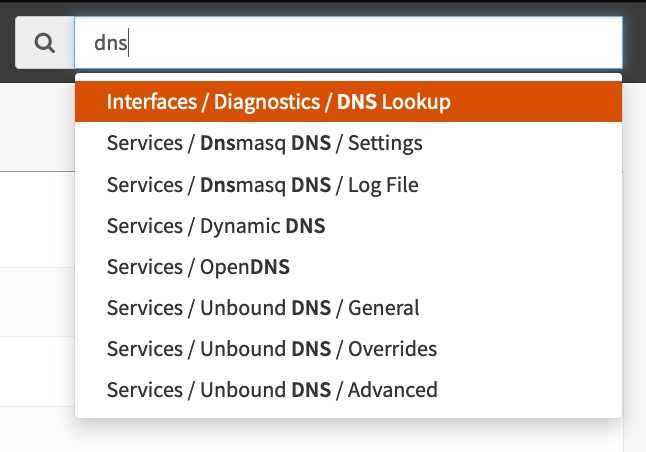
After Migrating to OPNSense I’ve really been impressed with it’s improvements over pfSense in various areas. I will repeat that I have nothing against pfSense, but OPNSense continues to surprise me the more I poke around and discover some of it’s unique features. Today we will take a quick look at one of my favorite features of OPNSense: the Search Bar!
OPNSense Search Bar
There’s not much to talk about other than the fact that it is super useful for finding some of those hidden menu items.
No more spending minutes trying to browse the menus for that one page you remember seeing but cannot seem to find anymore.
No more having to search the pfSense documentation or forum for finding the location of a specific setting.
Fuzzy Searching Works:
Limitations
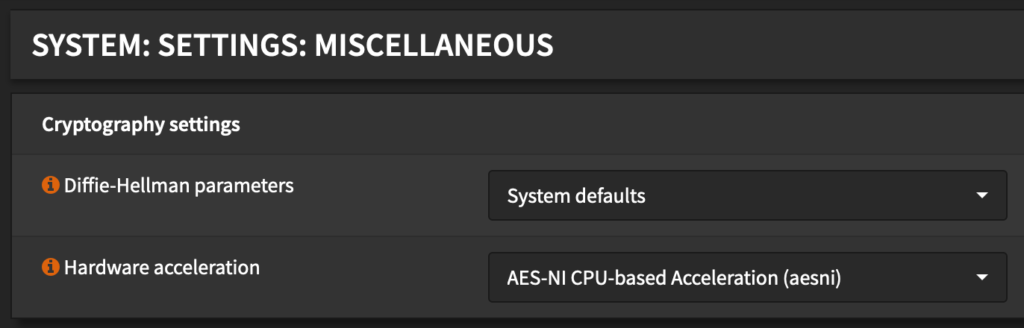
One limitation is that individual settings are not displayed (only settings ‘pages’ are)
For example, if i search for Hardware acceleration does not reveal the System > Settings > Miscellaneous page:
TLDR: A Nextcloud description is below, but why not just check out the demo!
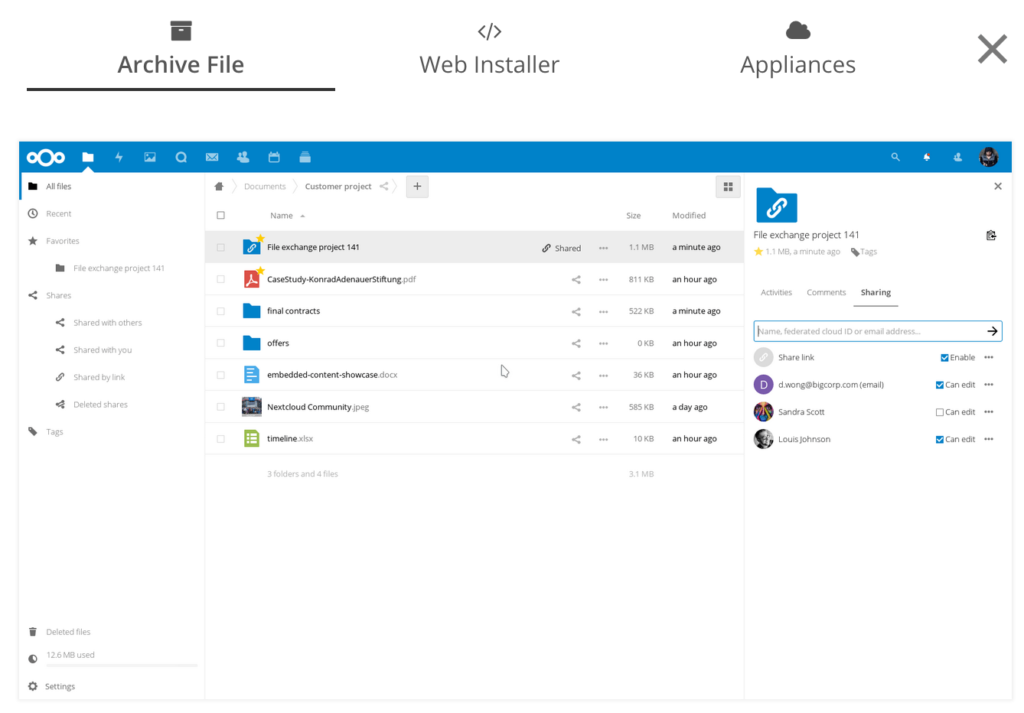
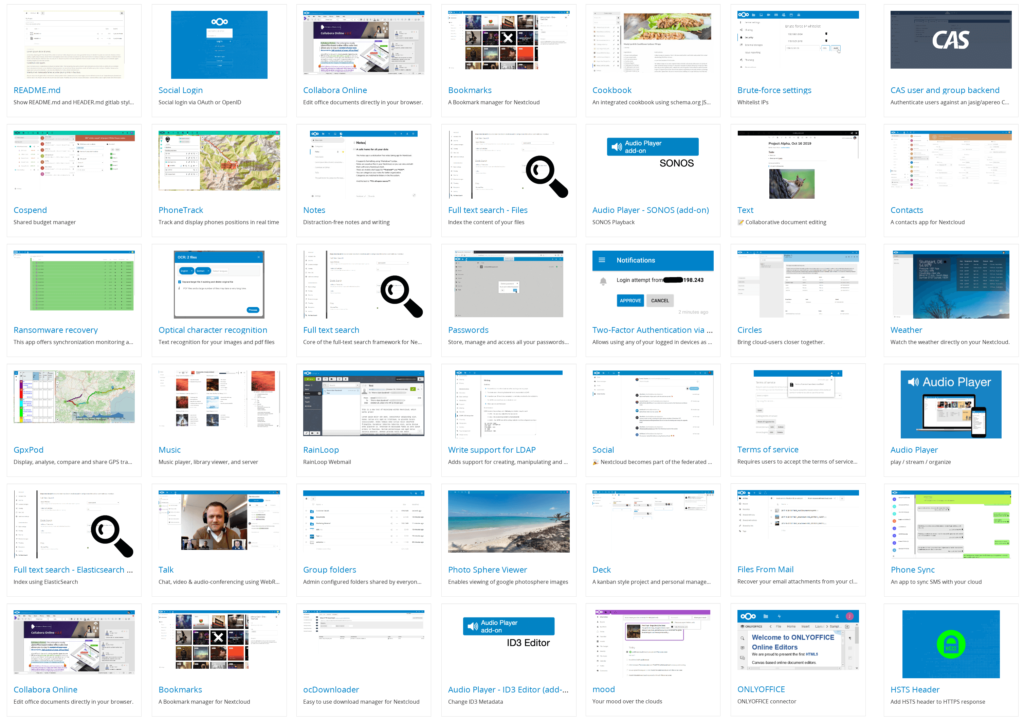
Nextcloud is a Free and Open Source Software (FOSS) that provides an enterprise grade all-in-one solution for file storage, collaboration, meetings, etc. Over the past few years Nextcloud has come a long way and is now my recommended solution for anyone seriously interested in hosting their own data with privacy and security in mind. Nextcloud is made up of many, many apps that can be installed as needed. Some of the apps include:
A sampling of a few Nextcloud apps
Files (This is installed by default and aids in storing/sharing/managing your files)
Calendar (This uses WebDav and can be synced to other devices more on this in a later post)
Tasks (This also can be synced using WebDav to other devices like MacOS/iOS Reminders)
Gallery (This helps with managing your photos in a centralized location)
Maps (Directions, pinning locations, mapping where your photos were taken, etc)
Contacts (Address book that uses WebDav to sync with other devices)
Bookmarks (Bookmark storage that can be synced to your browser using Floccus)
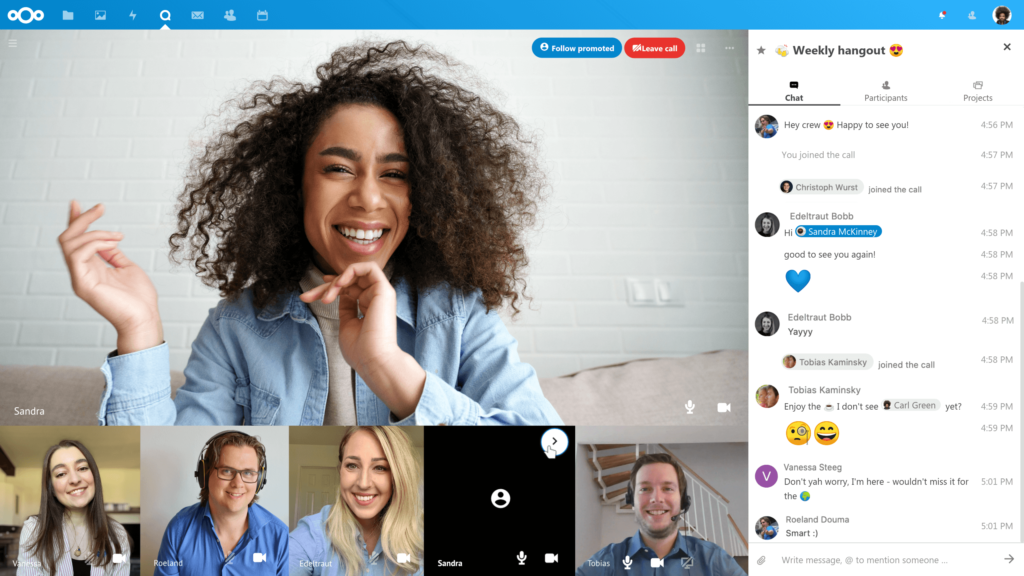
Talk (Meeting software like Zoom or Jitsi, no Nextcloud account needed to join calls!)
Mail (A very functional Mail client application with encryption, multiple accounts, etc)
Other features:
2 Factor Authentication
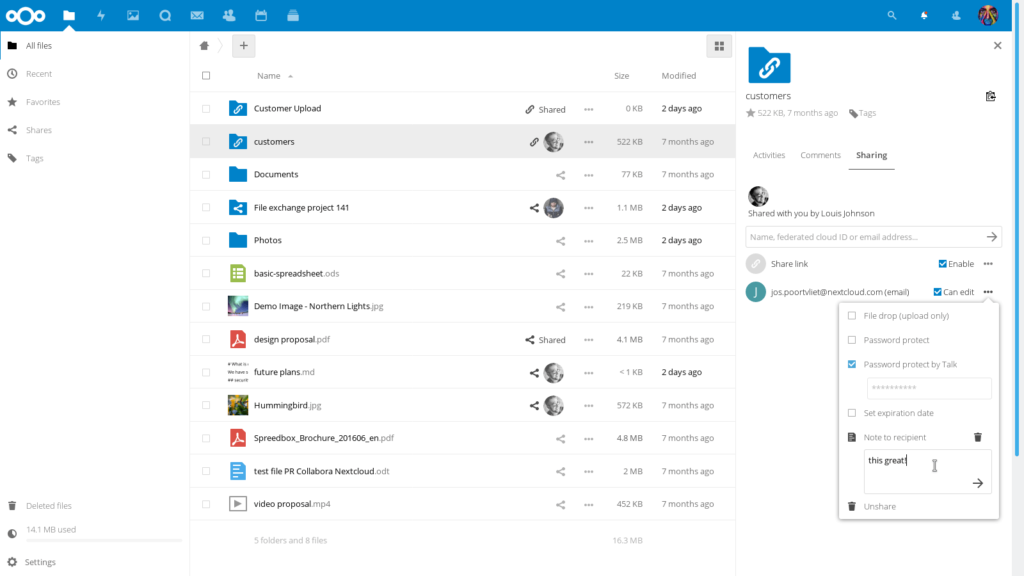
File Sharing policies (timeframe, encryption options, public link expiration, etc)
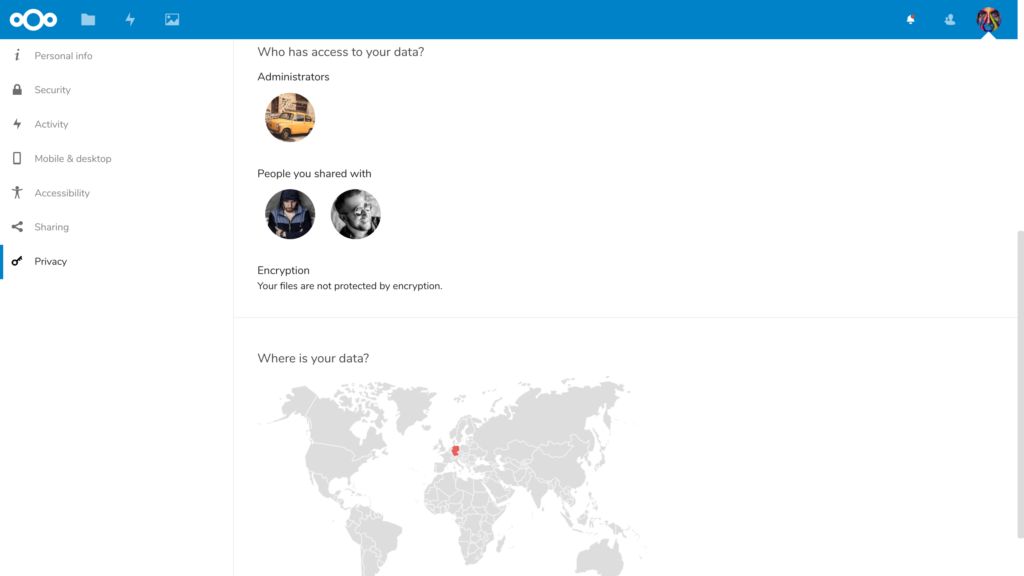
Why use Nextcloud? Simply put: data privacy. Nextcloud provides a private and secure vault for all your personal information. No need to worry about Google reading your emails and using your photos for machine learning purposes. No need to pay Dropbox or any other cloud storage company a monthly fee for storing your files on a server you have no control over. Nextcloud makes it easier to take responsibility for your own data so you know where it resides. If you’re still not convinced, check out Nextcloud’s reasoning.
When Nextcloud
Given my bullish stance on Nextcloud, I would also like to make clear that Nextcloud isn’t for everyone. It does require some technical experience and a use case that is worth while. Nextcloud works best and is most enjoyable when it is used for more than just a few files. Casual or non-technical Nextcloud users would be better off signing up with a Nextcloud provider rather then self-hosting it since the providers will handle the configuration and hosting of the storage (this however does reduce your visibility in where and how your data is stored). An alternative to a cloud provider is to buy a dedicated, pre-configured piece of Nextcloud hardware with some tech support.
How Nextcloud
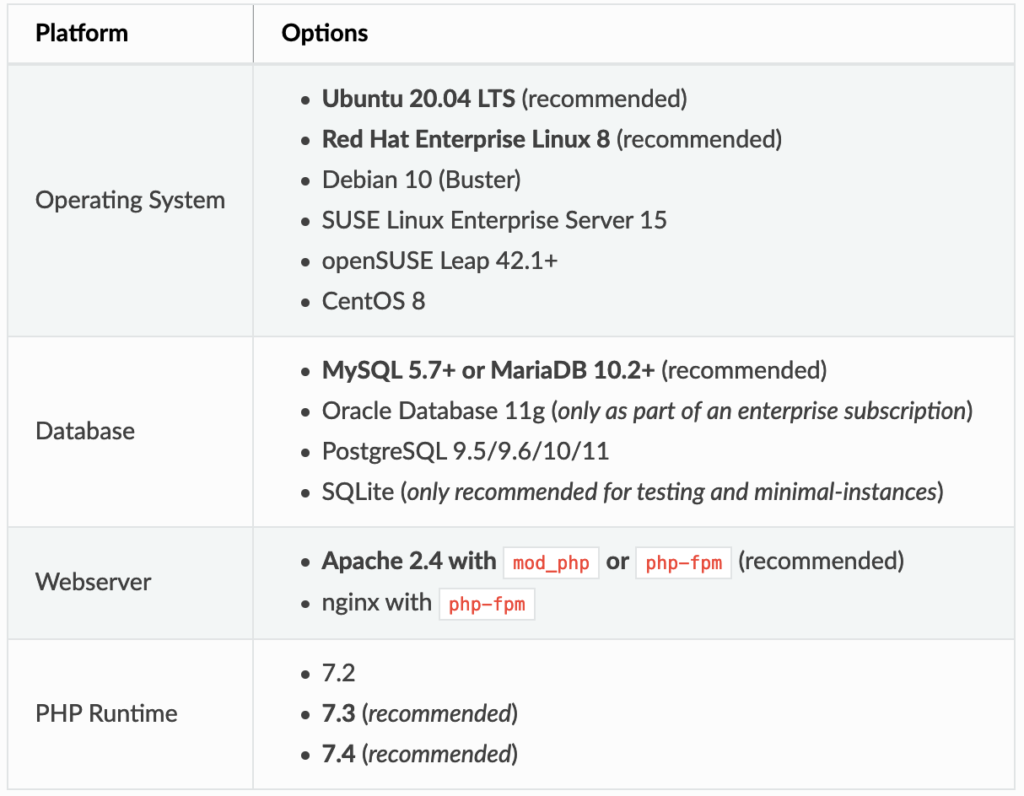
Requirements
Memory Required: 512MB
Nextcloud can be installed in a variety of ways. My preferred method is using the per-configured virtual appliance, but other methods include docker, Ubuntu snap, web-server script, archive extraction. Detailed installation instructions can be found in the Nextcloud Docs, but a simple rundown of the installation methods are listed below:
Appliance
Virtual Machine (My preferred method)
I prefer this method since it allows me to take easy snapshots/backups of the entire Nextcloud environment. This gives me peace of mind so I can be sure I can rollback to a point in time if anything goes wrong.
Download the Virtual Machine (There are also advanced-configured VMs here)
Setup a VM in your favorite Hypervisor (Proxmox, Hyper-V, VirtualBox, VMWare, etc)
Import the downloaded Virtual Machine file and start the virtual machine (check the console)
Login to the pre-configured Nextcloud instance and enjoy!
Appliance: Docker (Great for those already using Docker)
For those already using docker, this method may be appealing. I avoided this option primarily because it didn’t have a very clean docker-compose setup.
On a docker-enabled machine run `docker run -d -p 8080:80 nextcloud`
Alternatively, if you use docker-compose, start with this template:
Appliance: Ubuntu Snap (Easy for Beginners, but not recommended!)
This installation method is very easy but does have some drawbacks. From my experience, updates are slower to be released to the Nextcloud ubuntu snap distribution and often has issues with edge cases (I’ve noticed this with Collabora docs). It is also very difficult to migrate Nextcloud from a snap installation to a different installation method (I learned this the hard way!).
Setup an ubuntu machine with snap enabled.
Run `snap install nextcloud`
Follow the installation steps and enjoy.
Web Installer (Good for C-Panel style web-hosting)
Download the php script from the Nextcloud Site
Upload the php scrip to your web server
Point your browser to the php script
Walk through the installation wizard (default user: ncadmin default password: nextcloud)
Enjoy!
Manual Archive File Installation (Most Difficult)
Download the Archive from the Nextcloud site
Extract the archive file to an accessible location on your web server
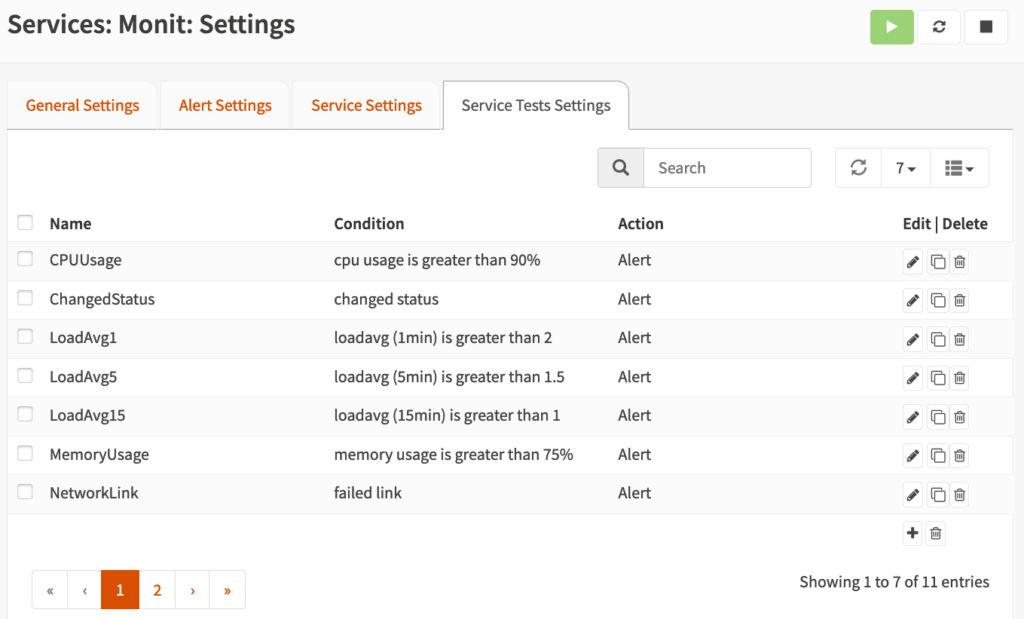
Now that we’ve setup a Zabbix server and configured some hosts, we need to get notified when there are issues with our hosts. The easiest way to be notified is probably via email (This is my go-to notification option since it is so widely supported).
Email Configuration
Configuring the email service is pretty straightforward:
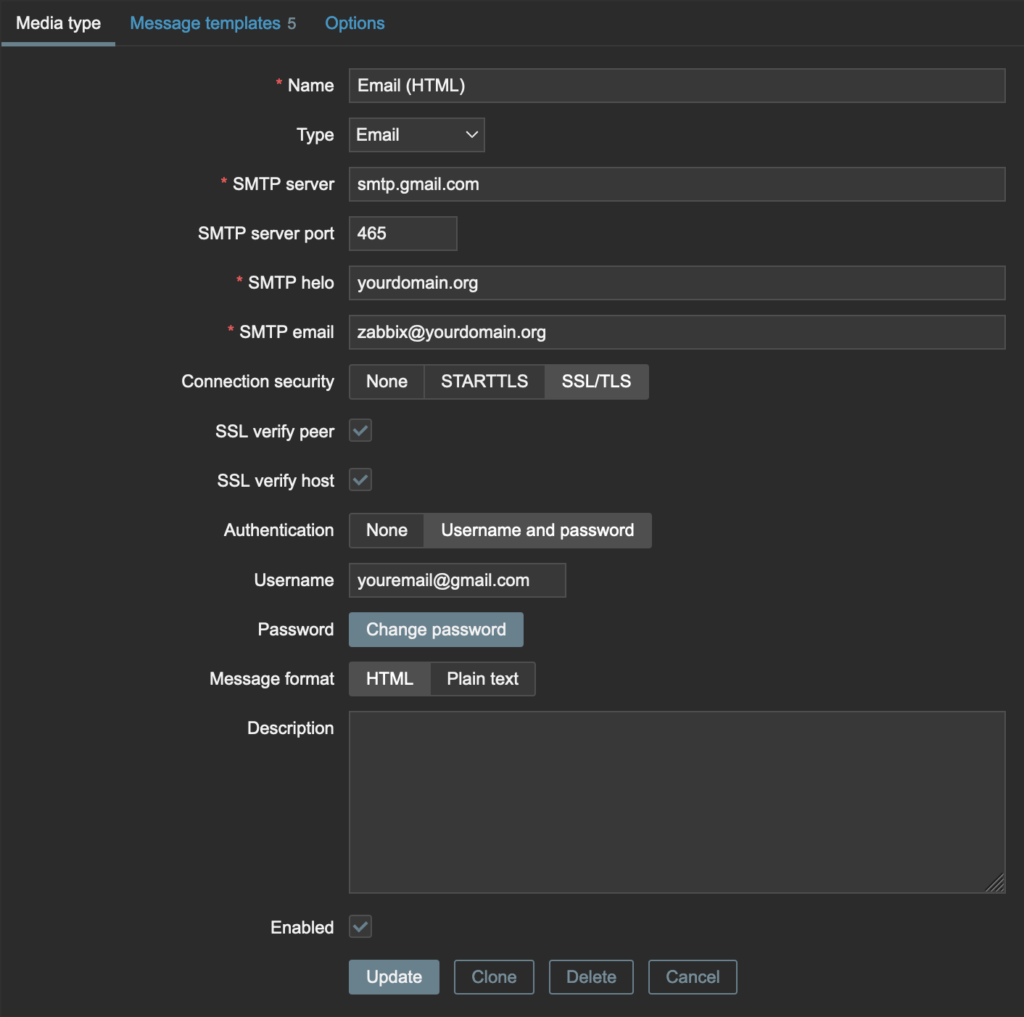
In the Zabbix WebUI navigate to: Administration > Media Types > Email (HTML)
Update the outgoing SMTP settings to match those of your email provider (i.e. Gmail)
Be sure to setup and use an App Password if you have two-factor enabled for your email account.
Click Update
Click Test to make sure the settings work.
Enable Email Notifications for User
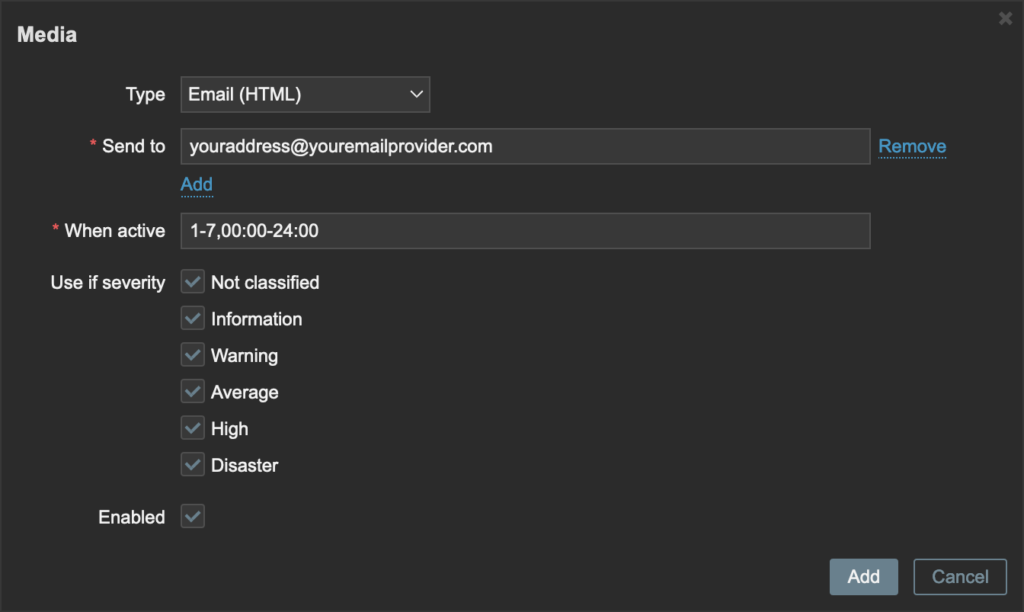
In order for emails to be sent, you need to enable them for your Zabbix user:
In the Zabbix WebUI navigate to: User Settings > Media > Add
In the Type box choose ‘Email (HTML)‘
Add the email address to which you would like to send notifications.
Click Add
Click Update
Choose Which Notifications to Receive
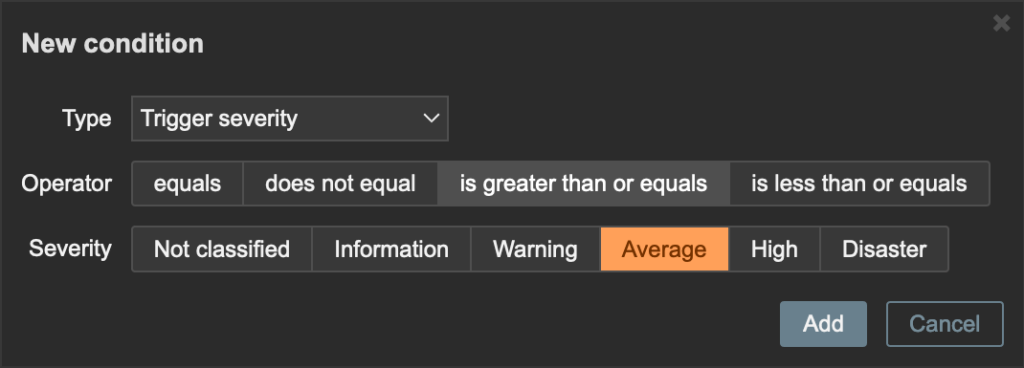
Now that we have the email service configured and the user set to receive emails, we need to tell Zabbix which types of emails to send (what severity, which hosts, or which triggers). In general I like to be notified of any triggers that have a severity of Average or above:
In the Zabbix WebUI navigate to: Configuration > Actions > Report problems to Zabbix administrators
Under Conditions click Add
Choose Type:Trigger severity and choose what severity you would like to be notified for (I choose ‘is greater than or equals’ a severity of ‘Average‘
Click Add
Check the Enabled box.
Click Update
Enjoy!
Now sit back and wait for the notifications to roll in – or instead of waiting, go make some breaking changes to your Hosts! (Just make sure you can roll back your changes easily with something like Proxmox backups/snapshots!)
If you’re not sure what Zabbix is or how to set it up, see my first Zabbix blog post. Once we have a running instance of the Zabbix server we can begin adding hosts that we would like to monitor. Adding a host consists of two primary steps: Configure the Client & Configure the Host (Server).
Configuring a Host
In order for Zabbix to get information from a client machine (Zabbix calls them Hosts) we need to configure some kind of protocol for Zabbix to use when fetching information. Some of the most popular protocols Zabbix uses are:
IPMI <- Good for enterprise gear (HP iLO, DELL DRAC, IBM RSA, Sun SSP, etc)
Below are a few host configurations for some of the above ‘protocols’.
Host Configuration: Zabbix Agent
In order to use the Zabbix agent, we can simply install the agent like any other package:
# Install the agent on Ubuntu/Debian
apt-get install zabbix-agent

# Configure agent with Zabbix server address
nano /etc/zabbix/zabbix_agentd.conf
# Update `Server=` to the ip/hostname of your Zabbix server

# Start the Zabbix Agent
service zabbix-agent start
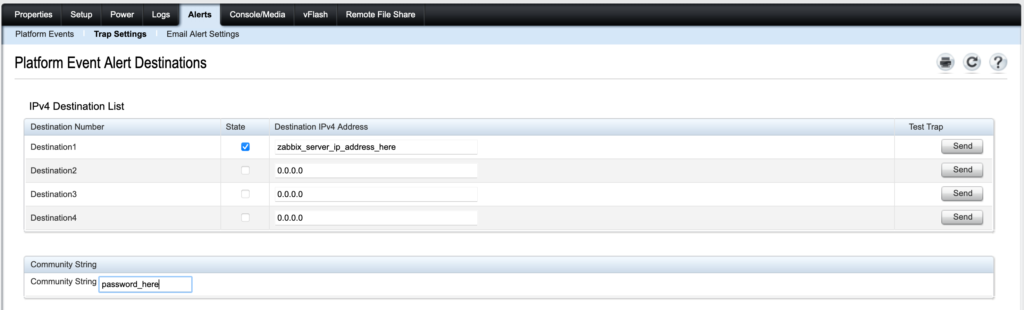
Host Configuration: SNMP
Configuring the host with SNMP will be different for each machine, but usually there is some kind of simple GUI that allows you to enable SNMP, and provide a community string (a sort of authentication). Here’s an example that used the term ‘Trap’ to represent the SNMP configuration:
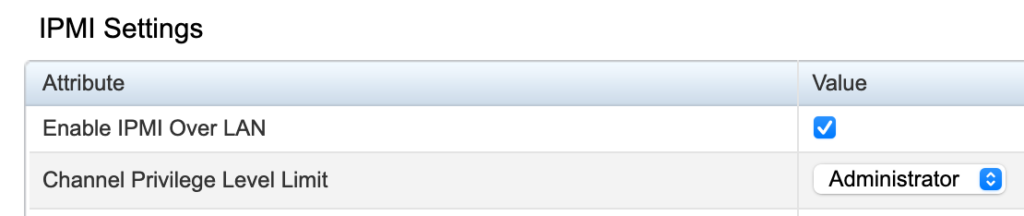
Host Configuration: IPMI
The IPMI configuration also may be different for each machine, but it is generally pretty easy to enable:
Configuring a Host on the Server (Zabbix)
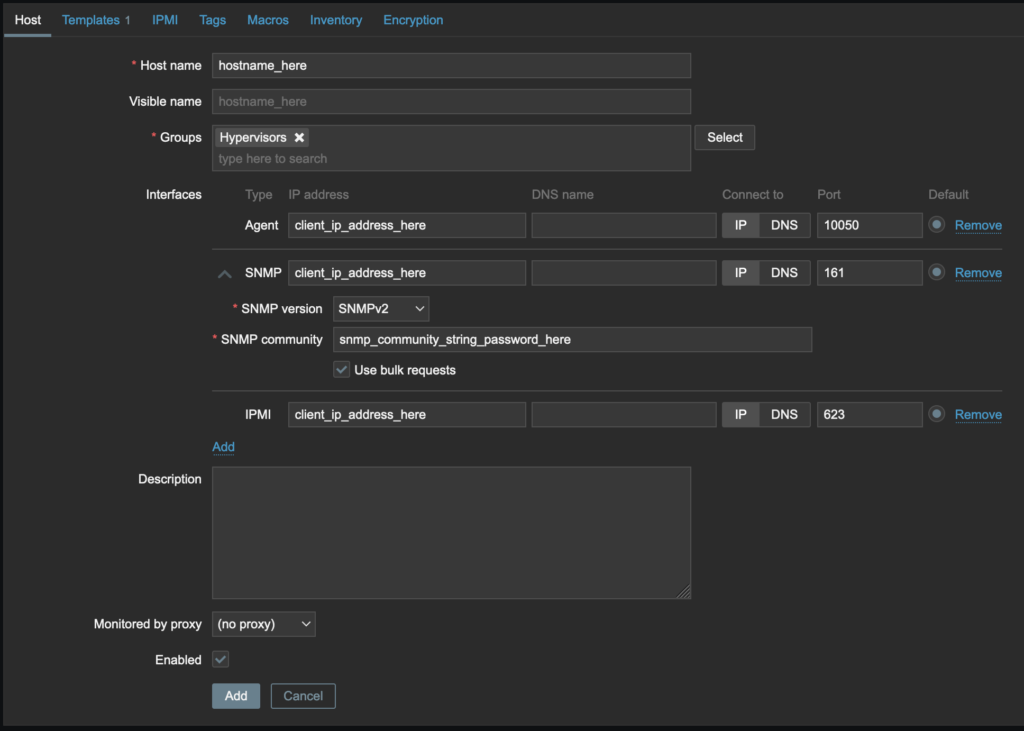
Once we have the hosts configured with at least once source ‘protocol’ we can add them to Zabbix. This is also pretty straightforward:
In the Zabbix WebUI navigate to: Configuration > Hosts > Add Hostand provide a hostname, a group and interface(s). Once finished, click Add. Note: you can also use a hostname in the DNS name field instead of an ip address.
Note: If configuring IPMI, you’ll need to provide the host credentials on the IPMI tab.
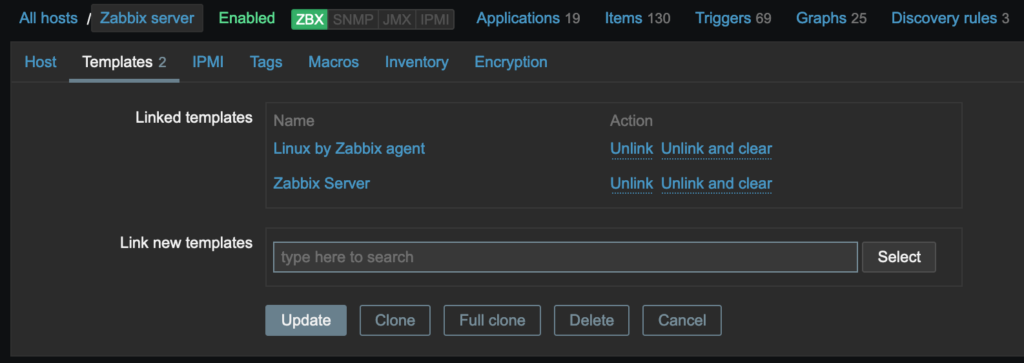
Also, be sure to add at least one Template to the host. Templates help Zabbix categorize the data it fetches from the hosts – templates can be used on many machines to standardize the data that is fetched from the hosts.
You can search for existing templates in the Link new templates field and add any relevant templates you think may be useful.
When searching for templates I usually search for the protocol (Agent/SNMP/IPMI/etc)
Monitor your Hosts
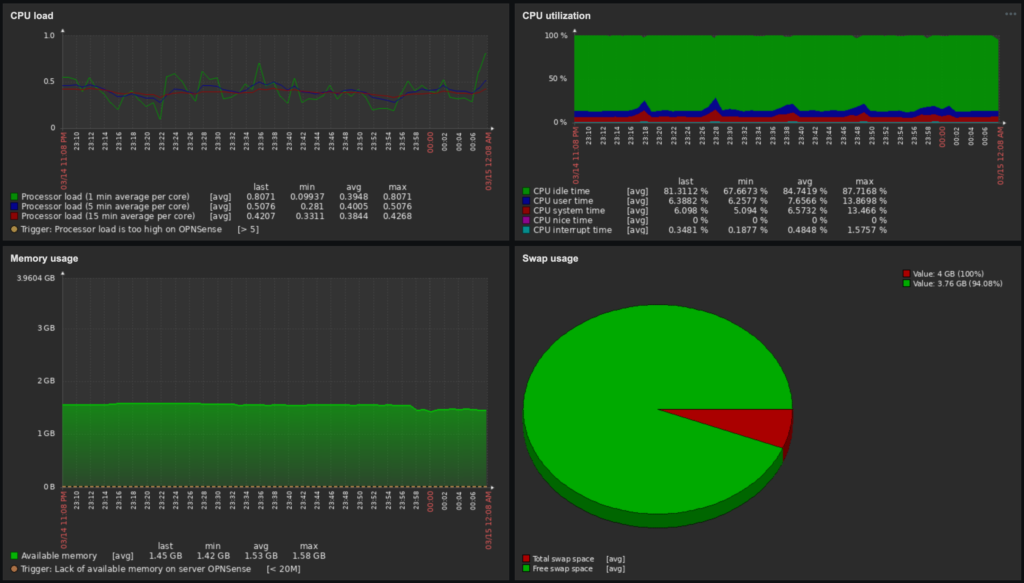
Now that we have some hosts added we can monitor them and view any problems or issues that may need to be addressed:
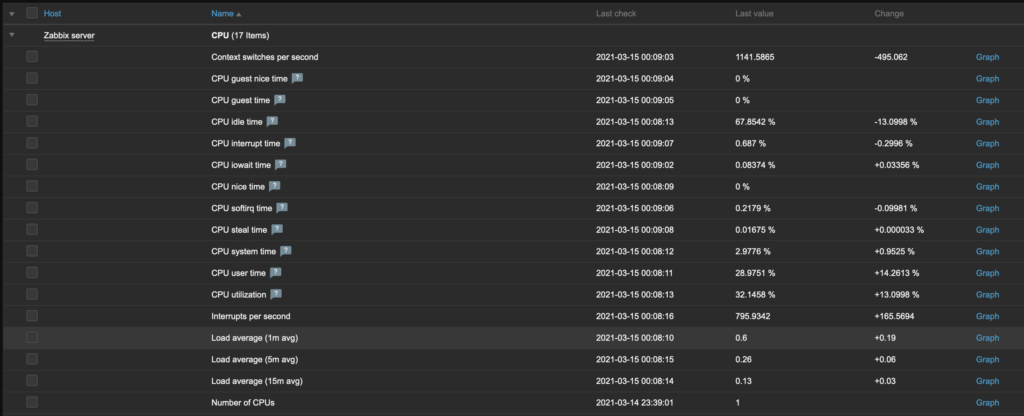
By clicking on the links we can view the Latest Data any Problems or even some nice Graphs for each Host:
Dashboards & Latest Data
There are some pretty slick options for getting notifications when problems happen, reporting, network maps, and more, but we’ll have to save those goodies for a future blog post. For now, get to work adding your hosts!
~ Thought of the Day: Why is it normal in the US for a waiter to take your credit card out of your sight when processing payments? To me this is like having your email password in plain text of the footer of your email!
With a quickly growing HomeLab that contains many servers/services/devices I am starting to see the importance of being able to monitor all these ‘things’ from a central location. My understanding is that the goal of Zabbix is to do exactly this. So lets give it a go!
Installation
Initially i figured I would just install Zabbix in Docker like I do for most other services, but i quickly realized that the docker-compose would get messy pretty quick (see here for a sample). After looking over the install options on the Zabbix site, i realized that they offer a virtual appliance that can be run on most hypervisors (I run proxmox which supports the qcow2 KVM disk format). Here’s my steps for installing the virtual appliance in Proxmox (additional installation details can be found on the Zabbix appliance documentation):
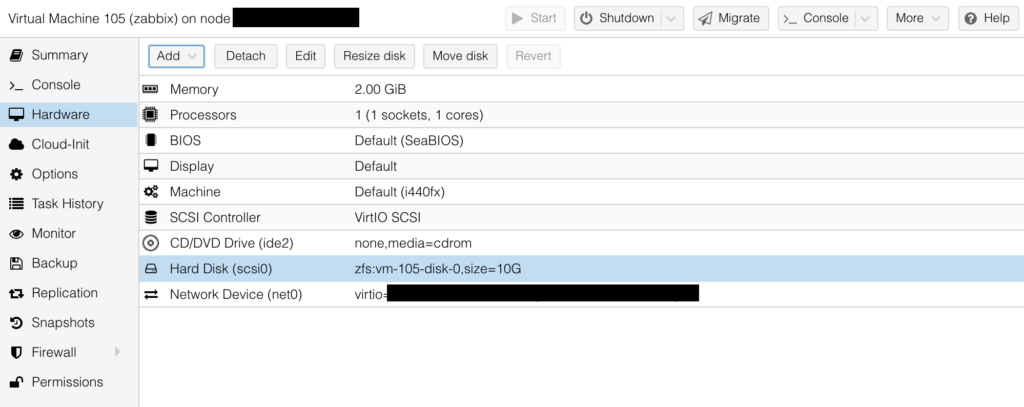
Create a Proxmox Virtual Machine
When creating the VM, you can use all the default options, just give it a name and remove the HardDisk after the VM is created (we will add the Zabbix appliance disk later).
VM Created in Proxmox (Shows Zabbix disk added)
Download the Appliance
# From the proxmox shell run the following to download the appliance
# Note: Right click the Zabbix appliance download link to get the latest version
wget https://cdn.zabbix.com/zabbix/appliances/stable/5.2/5.2.5/zabbix_appliance-5.2.5-qcow2.tar.gz
Unzip the Appliance
tar -xvzf zabbix_appliance-5.2.5-qcow2.tar.gz
Import the Appliance Disk to the Virtual Machine
# Note: Change the vm id, the appliance version and the storage type below
#       (you may need to use 'local' if you are not using 'zfs')
qm importdisk 105 zabbix_appliance-5.2.5.qcow2 zfs

# Cleanup unneeded files
rm -rf zabbix_appliance-5.2.5-qcow2
rm zabbix_appliance-5.2.5-qcow2.tar.gz
Update VM Options
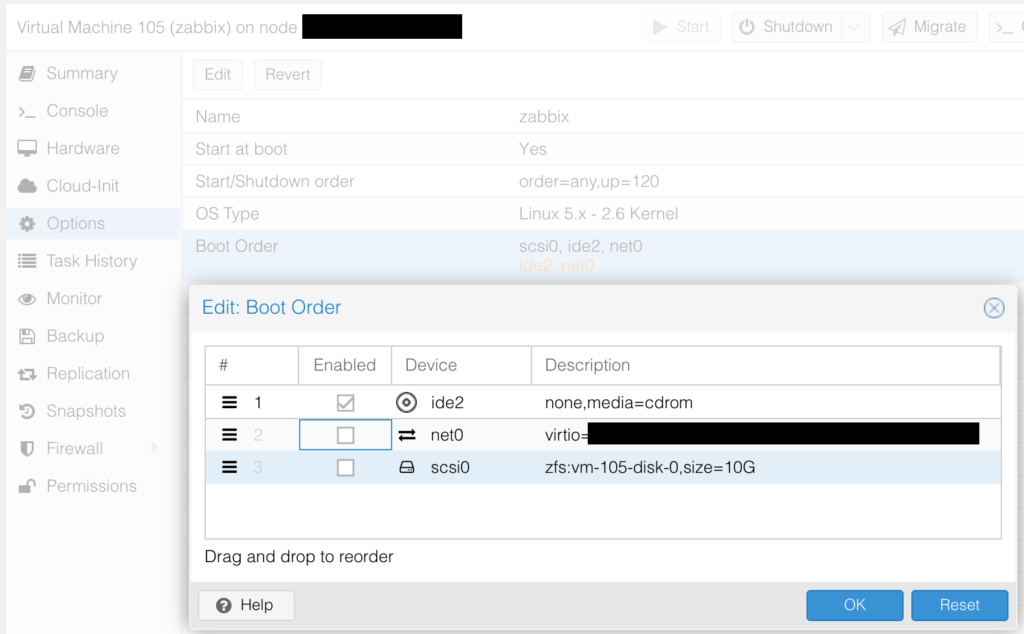
At this point you’ll want to make sure your VM is set to boot from the imported disk and to start on boot.
Set VM to boot from imported disk
Assign Static IP Address (Optional)
Note: At this point it may be helpful to assign a DHCP Static mapping so your VM will receive a static IP address from your Router. This is how I did it in OPNSense:
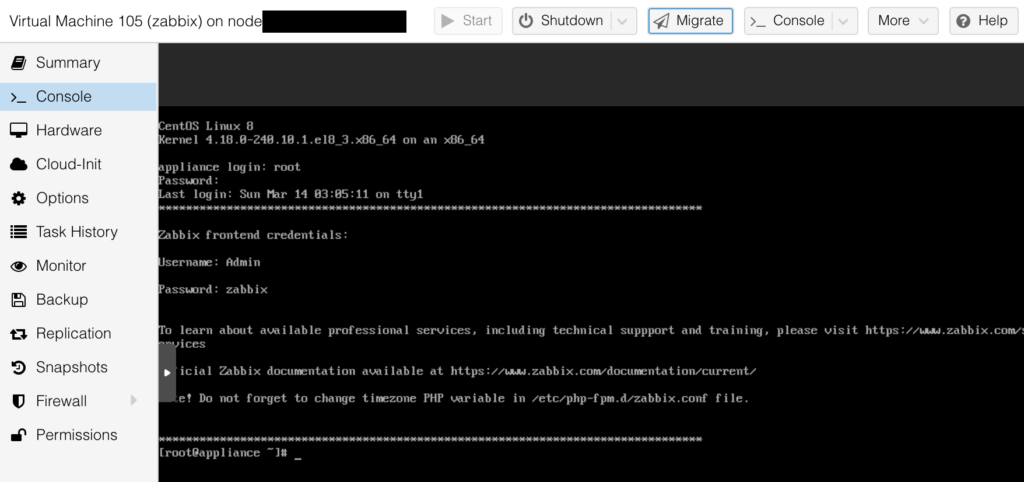
Start VM
Now that we’ve got the VM setup, go ahead and start it up! The default login credentials were: User: root Pass: zabbix Note: The default front-end web interface default login is shown in the console below: User: Admin Pass: zabbix
Proxmox Console View
Log Into the Web Interface
In your browser navigate to the IP address of your Zabbix VM:
Zabbix Web Login
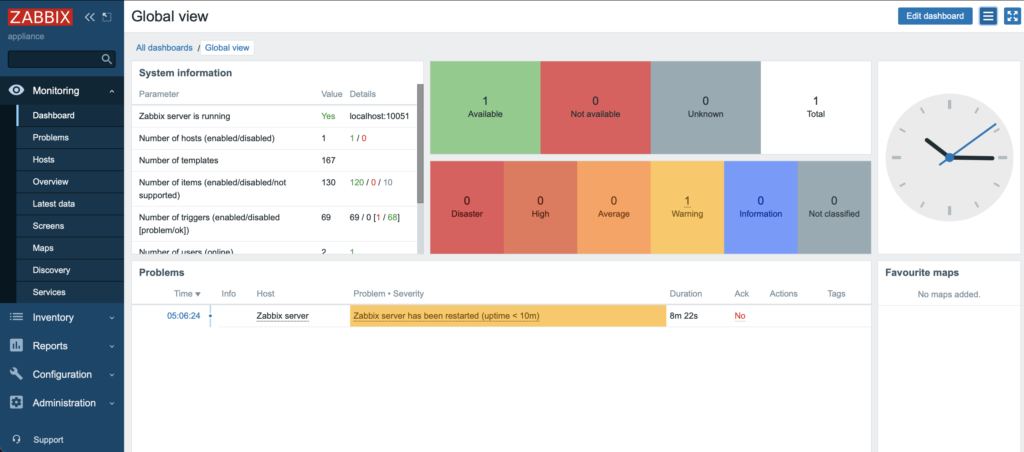
Zabbix Dashboard
Congratulations. You have have a running Zabbix Instance! Don’t forget to finish configuring and securing your instance. A few items I addressed immediately were:
Changing Web login credentials: WebUI > User Settings > Change Password
For fun: change to the dark theme: WebUI > User Settings > Theme
Get Monitoring!
Now that you’re setup, what are you waiting for, get started monitoring all the things! We won’t cover how to setup monitoring in this post, we’ll save that for a future post which delves deeper into the benefits and use-cases of Zabbix. Enjoy! Also see Zabbix Host Configuration and Zabbix Email Notifications.
I’ve been happily using pfSense for a few years now and have generally been quite happy with it’s performance and feature set, however I learned recently that the installation files that can be downloaded from the pfSense website is not the same code that is open sourced on Github. I try to stay away from the arguments about which software is ‘more’ open source friendly, but I do like to support the projects that are committed to a FOSS (Free and Open Source) model without up-selling additional features. I don’t have anything against up-selling additional features, but IMO up-selling additional features can lead to a neglected core product.
pfSense – Thank You
I am not leaving pfSense because I didn’t like the project, but because I wanted to try something new that is more committed to an Open Source future. pfSense is a great solution for any networking enthusiast, and I would not hesitate to recommend it. However, as you will see below, I would first recommend OPNsense for a few main reasons…
Full-featured email notifications (pfSense had some email notifications but they were severely limited)
I’ve always wondered about OPNsense and if it could offer some of the things I often wanted in pfSense but could not easily achieve, and so far I have been very pleasantly pleased with the installation & configuration.
Installation
Installation was straightforward (although I installed it in a Proxmox VM):
Download ISO from OPNsense website & upload ISO to Proxmox server
Finish the rest of the configuration in the OPNsense web GUI (Default user/password: root/opnsense)
Migrating from pfSense
The most daunting task that I was dreading was figuring out how to migrate to OPNsense from pfSense with minimal downtime. I had heard of a slight possibility that certain sections of pfSense configuration backups could be imported into OPNsense, but I decided to avoid that route in order to start with as clean of an OPNsense installation as possible. My migration path was:
Step through each menu in pfSense and update the corresponding setting in OPNsense
Some configuration items didn’t exist like the awesome pfBlocker (I will miss this)
When I came to the ‘Interfaces’ section, I setup each interface with a different (temporary) static IP
After all configuration items were finished, I began to shut down services on pfSense and enable them on OPNSense one at a time (i.e., disable dhcp on LAN, and enable LAN DHCP on OPNSense with same lease range)
Finally I disabled the interfaces on pfSense and re-configured the static IP addresses on the OPNSense interfaces to match how they were configured in pfSense.
The Features I’ve Always Wanted!
Full-featured Email Notifications, Reporting, Settings Search, Home Assistant Integration…